Lab 3: Reverse transcription and qPCR, analyze qPCR (via computer data and agarose gel) Primer design, and Protein Extractions
Please print these lab materials before each lab.
Lab Objectives
- Reverse transcribe RNA to cDNA
- Perform qPCR on your cDNA samples
- Run qPCR samples on agarose gel
- Mock-up Experiment to prepare for the initiation of experiments
- Design and order primers
Supplies and Equipment:
- Micropipettes (1-1000 μl)
- Sterile filter pipette tips (1-1000 μl)
- Tip waste jar
- PCR tubes (0.5 ml; thin walled)
- RNA samples (student provided)
- M-MLV reverse transcriptase
- M-MLV 5X reaction buffer
- Oligo dT
- dNTPs
- Nuclease Free water
- thermal cycler
- microfuge tube racks
- PCR tube racks
- ice buckets
- Kimwipes
- Lab coat
- Safety glasses
- gloves
Procedure background
A reverse transcriptase, also known as RNA-dependent DNA polymerase, is a DNA polymerase enzyme that transcribed single-stranded RNA into double-stranded DNA. It also helps in the formation of a double helix DNA once the RNA has been reverse transcribed into a single strand cDNA. Normal transcription involves the synthesis of RNA from DNA; hence, reverse transcription is the reverse of this. The resulting cDNA is more stable than RNA (which degrades quickly) can be used for downstream applications such as measuring gene expression. Partial nucleotide sequences of cDNAs are often obtained as expressed sequence tags. (This text has been adapted from Wikipedia)
REVERSE TRANSCRIPTION
- Mix your stock RNA sample by inverting tube several times.
-
In a 0.5 ml PCR tube labeled with your initials and “cDNA” combine the following:
- 5 μl of YOUR total RNA (extracted and quantified in lab)
- Make a master mix with the following reagents (volumes listed are for a single reaction; calculate how much of each reagent you will need based on the number of reactions you'll be running)
- 0.5 μl of oligo dT (for eukaryotes) OR 0.5 μl of random primers (for prokaryotes)
- 12.25 μl of nuclease free H2O
- Add 12.75 μl of the master mix to each of your PCR tubes containing 5μl of your RNA.
.
-
Incubate the mixture for 5 min at 70°C in the thermalcycler then immediately transfer to ice. Briefly centrifuge your tube.
- Make a master mix with the following reagents (volumes listed are for a single reaction; calculate how much of each reagent you will need based on the number of reactions you'll be running)
- 5 μl of M-MLV 5X Reaction Buffer
- 1.25 ul of dNTPs
- 0.5 μl of M-MLV RT
- 0.5 μl of nuclease free H2O
- Add 7.25 μl of the master mix to each reaction, mix and briefly centrifuge reaction tubes.
- Incubate the mixture for 60 min at 42°C (for oligo dT) or at 37°C (for random primers) and then heat inactivate at 70°C for 3 min on the thermalcycler.
- Spin down the sample in a desk top centrifuge.
- Store on ice or at -20°C
Quantitative PCR
Supplies and Equipment:
- PCR Plates (white); optically clear caps
- 1.5 ml microfuge tubes (RNAse free)
- Nuclease Free water
- filter tips
- Opticon thermal cycler
- kim wipes
- 2x Immomix Master Mix
- SYTO-13 Dye
- microfuge tube racks
- ice buckets
- timers
- cDNA samples (student provided)
Procedure Background
-
Real-time polymerase chain reaction, also called quantitative real time polymerase chain reaction (Q-PCR/qPCR/qrt-PCR) or kinetic polymerase chain reaction (KPCR), is a laboratory technique based on the PCR, which is used to amplify and simultaneously quantify a targeted DNA molecule. It enables both detection and quantification (as absolute number of copies or relative amount when normalized to DNA input or additional normalizing genes) of one or more specific sequences in a DNA sample.
-
The procedure follows the general principle of polymerase chain reaction; its key feature is that the amplified DNA is detected as the reaction progresses in real time, a new approach compared to standard PCR, where the product of the reaction is detected at its end. Two common methods for detection of products in real-time PCR are: (1) non-specific fluorescent dyes that intercalate with any double-stranded DNA, and (2) sequence-specific DNA probes consisting of oligonucleotides that are labeled with a fluorescent reporter which permits detection only after hybridization of the probe with its complementary DNA target.
-
Frequently, real-time PCR is combined with reverse transcription to quantify messenger RNA and Non-coding RNA in cells or tissues.
qPCR PROCEDURE
You will run each template (cDNA) in duplicate in addition to two negative controls (no template) - calculate how many reactions this will be!
1. Prepare master mix: Prepare enough master mix for your number of reactions +1 to ensure sufficient volume recovery.
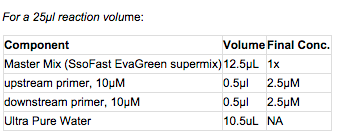
2. Add mastermix to wells of a white PCR plate
3. Thaw cDNA samples.
4. Add 1uL cDNA template to each reaction.
5. Add 1uL of ultra pure water to the negative control wells.
6. Cap the wells securely.
7. If necessary, spin the strips to collect volume in the bottom of the wells.
8. Ensure the lids are clean and place strips on ice. (I like to wipe the lids with a clean kimwipe)
9. Load the plate, verify the PCR conditions and start the run (this will be done by your TA).
PCR conditions:
1. 95°C for 10 minutes
2. 95°C for 15s
3. 55 °C for 15 s
4. 72°C for 15 s (+ plate read)
5. Return to step 2 39 more times
6. 95°C for 10s
7. Melt curve from 65°C to 95°C, at 0.5°C for 5s (+plate read)
Making an agarose gel
Supplies and Equipment:
- Micropipettes (1-1000 μl)
- Sterile filter pipette tips (1-1000 μl)
- Tip waste jar
- 1L flask
- agarose
- 1X TAE
- Ethidium bromide
- Microwave
- Gel rigs
- Kimwipes
- Lab coat
- Safety glasses
- gloves
AGAROSE GEL POURING PROCEDURE
- Weigh 2g of agarose and mix with 150mL 1x TAE in a 1L flask
- Microwave solution for ~ 3 minutes. Keep an eye on the solution so that it does not boil over. You want the solution to be clear - no precipitate and no bubbles.
- Cool solution (you should be able to touch the flask for a few seconds), then add 12uL ethidium bromide(EtBr). WARNING: EtBr is a carcinogen be sure to wear gloves and appropriately dispose tip waste.
- Mix thoroughly by swirling, then pour into gel tray.
- Add gel combs. Using a clean pipet tip, pop any bubbles that could get in the way of your PCR product.
- After gel is set, wrap in plastic wrap (label with your initials and date) and place gel in the fridge if not using immediately.
Agarose Gel Electrophoresis
Procedure Background
- Nucleic acid molecules are separated by applying an electric field to move the negatively charged molecules through an agarose matrix. Shorter molecules move faster and migrate farther than longer ones because shorter molecules migrate more easily through the pores of the gel. This phenomenon is called sieving.
- The most common dye used to make DNA or RNA bands visible for agarose gel electrophoresis is ethidium bromide usually abbreviated as EtBr. It fluoresces under UV light when intercalated into DNA (or RNA). By running DNA through an EtBr-treated gel and visualizing it with UV light, any band containing more than ~20 ng DNA becomes distinctly visible. EtBr is a known mutagen, however, so safer alternatives are available.
- A DNA ladder is a solution of DNA molecules of different lengths used in agarose gel electrophoresis. It is applied to an agarose gel as a reference to estimate the size of unknown DNA molecules
- If amplification was successful you should see one clear band between 150-400bp (in length depending on your gene) and the negative controls will have no band. If there is a band in the negative control than there might be contamination in your reagents and you can not be sure that the intended gene was actually amplified.
- Often contamination requires carful rePCR in case the contamination occurred during reaction setup. However, if any reagents are contaminated troubleshooting may be required to obtain a clean PCR product.
- PCR bands outside of the intended size range could indicate unspecific amplification and will require either optimization of the reaction cocktail and thermal cycling parameters or redesigning the primers.
ELECTROPHORESIS PROCEDURE
- Place gel in gel box and fill with 1x TAE buffer (to fully cover wells)
- Remove combs from wells
- Load 7uL 100bp ladder in far left lane
- Load 20uL of your PCR sample into the gel (retain the remaining vol at -20ºC)
- Run gel at ~ 100V for ~ 1hr
- Visualize the gel on the UV transilluminator
Experiment Mock-up
- Now that you know what your biological question is and what controls and replicates you'll need for this experiment, you'll need to do a mock-up of the experimental containers so that the system will be ready later in the week when your experiment starts.
- A number of containers, heating elements, water baths, airstones and pumps are available. Work as a group to decide how the experiment will be organized.
Primer Design
Primers, or oligonucleotides (oligos), are short stretches of synthetic DNA that are used most commonly for PCR and DNA sequencing. They direct DNA polymerases to specific regions on larger DNA molecules for amplification. They are designed in pairs to amplify DNA in the forward and reverse directions. Oligos are custom synthesized by various manufacturer's to contain the precise sequence requested by the customer. For a good introduction to the theory of primer design procede to this link.
Photo source: <http://bioweb.uwlax.edu/genweb/molecular/seq_anal/primer_design /primer_design.htm>
Here is a breif list of things to take into consideration when designing primers. Although none of these are absolute, they will help ensure your primers will hybridize to your target sequence with the best efficiency.
1. Design your primers to be within 18-30 bases in length.
2. The melting temperature (Tm) of primers should be within 2C of each other.
3. Avoid primer dimers and primer hairpins
4. Avoid high G/C stretches, particularly at the 3' end
5. G/C clamp at 3' end of primers.
Primer design is most commonly done via computerized means and the algorithms used take the above rules into consideration. Of course, the user always has the opportunity to adjust the parameters that define how primers are designed by the software. There is a great deal of software available for primer design. Two commonly used primer design tools are NCBI Primer and Primer 3. The software will allow you to enter a full DNA sequence and then define what region(s) you would like to amplify, the ideal size of the amplicon (PCR product), the ideal length of the oligos, etc. However, often the preset conditions are already optmized to Additionally, after you have selected some proposed primers, you can compare melting temps, G/C content, primer dimer/hairpin probabilitites, etc.
We will go over the process of designing primers in more detail in lab.
Protein Extraction and Analysis Part 1
Supplies and Reagents
- micropipettes (1-1000uL)
- sterile filter pipette tips (1-1000uL)
- sterile (RNase free) 1.5mL microcentrifuge tubes
- sterile 2 mL screw cap microcentrifuge tubes
- sterile disposable pestles
- spectrophotometer
- cuvettes for spectrophotometer
- microcentrifuge (refrigerated) or in fridge
- ice buckets
- gloves
- Kim wipes
- lab pens
- safety glasses
- CelLytic MT Cell Lysis Reagent (with Protease Inhibitor Cocktail added)
- Coomassie Protein Assay Reagent
- DI water
Procedure Background
This section provides an explanation of the methods being used and provieds some essential background information.
- You will isolate cellular protein from whole tissue using CelLytic MT. This is a proprietary reagent that contains a mixture of salts and detergents to effectively disrupt lipid membranes, lyse cells, and buffer the cellular proteins at the appropriate pH. This solution will also be supplemented with a cocktail of protease inhibitors to minimize the impact of the numerous proteases that are ubiquitous within all cells.
- After extraction, you will determine the concentration of proteins in your sample. Due to the high variability of protein structures, these molecules do not uniformly absorb light at any specific wavelength like nucleic acids. We will use the Bradford Assay to determine the concentration of proteins in your sample. This is a colorimetric assay that uses a reagent (Coomassie Blue) that interacts with proteins. When the reagent is mixed with a solution containing proteins, the solution will turn different intensities of blue depending on the amount of proteins present in the sample. This blue dye absorbs at 595nm and the absorbance can be directly correlated to a specific amount of protein present in the sample when compared to a standard curve.
- A standard curve is created by conducting the assay with a set of proteins of known concentration (standards). A dilution series is created from these standards to span the maximum possible range of detection for the assay. This dilution series is then processed according to the assay protocol and measurements are taken. The measurements resulting from these standards are then plotted on a graph and a best fit line is created using these data points. From this best fit line, an equation can be obtained for the slope of the line (y = mx+b). This equation allows you to now put in any value you obtain from an experimental sample and determine the concentration of proteins in that sample.
- Due to the dynamic nature of the reaction taking place in the Bradford Assay (and virtually all assays), a standard curve should be created using the exact same reagents and equipment that will be used for the experimental samples. This helps to account for variation between different pieces of equipment as well as slight differences between reagent lots. Ideally, a new standard curve should be made each time a set of experimental samples are being assayed to ensure the best accuracy. For the sake of time, a standard curve has already been determined.
IMPORTANT SAFETY NOTES
- Wear clean gloves! Proteases are present on you skin and are detrimental to the integrity of your samples.
- Mixing - The Bradford assay works best when samples are mixed well. Invert tubes frequently during incubations, and immediately before measuring absorbance to ensure accurate absorbance readings.
PROTEIN EXTRACTION PROTOCOL
- Record the weight of your tissue that has been denoted on the tube.
- Label the snap cap tube containing your tissue sample with your initials and the date using a lab marker.
- Add 500 ul of CellLytic MT solution to the 1.5mL snap cap tube containing your cut piece of frozen tissue.
- Homogenize the tissue with a sterile disposable pestle.
- Close the tube and invert the tube several times.
- Please find a few other people at or near this same stage and form a group for this step. Spin the tube in a refrigerated microfuge for 10 mins at max speed.
- While spinning, label a fresh tube with the word "Protein", source organism/tissue, your initials, and today's date.
- Carefully transfer supernatant (the clearish liquid on top) to labeled tube and store tube on ice.
PROTEIN QUANTIFICATION PROTOCOL
- Lable a fresh 2 mL screw cap tube withe the word "Protein", BA (for Bradford Assay), your initials, and today's date.
- Dilute an aliquot of your protein sample 1:2 by pipetting 15uL of your protein sample into the 2 mL screw cap tube and the pipetting 15uL of DI water. Mix well by pipetting. Note: this dilution step is performed to ensure the sample absorbance falls within the range of the standard curve
- In a second 2 mL tube pipette 30uL of DI water (this tube will serve as your blank). Label tube as 'blank'
- To both tubes add 1.5mL of Bradford reagent. Tip: Pippet 1000ul of reagent into each tube and then pipet another 500 ul of reagent into each tube for a total of 1500u ul or 1.5 mL.
- Invert the tubes several times and then incubate at room temperatire (RT) for 10mins.
- Mix the 'blank' via pippeting and transfer to a 1000ul to a plastic, disposable cuvette.
- Zero the spectrophotometer using your blank sample. Be sure to wipe the cuvette with a KimWipe first as any fingerprints or smudges can alter the reading.
- Mix the 'sample' via pippeting and transfer 1000 ul to a plastic, disposable cuvette
- Measure the absorbance at 595nm and record the value. Be sure to wipe the cuvette with a KimWipe first as any fingerprints or smudges can alter the reading.
- . Remove the cuvette from the spectrophotometer. Using a P1000 set to 1000 ul, carefully pipette the solution in the cuvette up and down a couple of times to mix.
- . Measure the absorbance at 595nm and record the value a second time.
- . Average the two absorbance values you recorded.
- . Back-calculate your protein concentration using the standard curve below. Hint: Use the equation on the graph provided. The relationship between absorbance and concentration is linear and defined by the equation y=mx+b. You have the average absorbance of your sample, x, and you want to calculate the concentration, y. Don't forget to account for the dilution in step 2!
- . Give your protein sample to the TA for storage at -20ºC.
Standard curve was generated per Manufacturers Instructions . Please Read and Understand!
Pierce:Coomassie (Bradford) Protein Assay Kit
