Objective:
Create Mastermix
Load tempate and run QPCR and get data
Methods:
Set up mastermix
3 primer sets with 2 blanks ans 10% extra for pippetting error was created using the volume below for each reaction.
So 3 sets of master mix was made with quantity of 24 reactions.
| Volume |
Final Conc. |
|
| 2X Sensimix Sybr (Bioline) |
12.5μl |
1x |
| SYBR 25X dye |
1 μl |
1X |
| upstream primer, 10 uM |
1.25 μl |
2.5 uM |
| downstream primer, 10 uM |
1.25 μl |
2.5 uM |
| Ultra Pure Water |
7 μl |
NA |
| CDNA |
2 μl |
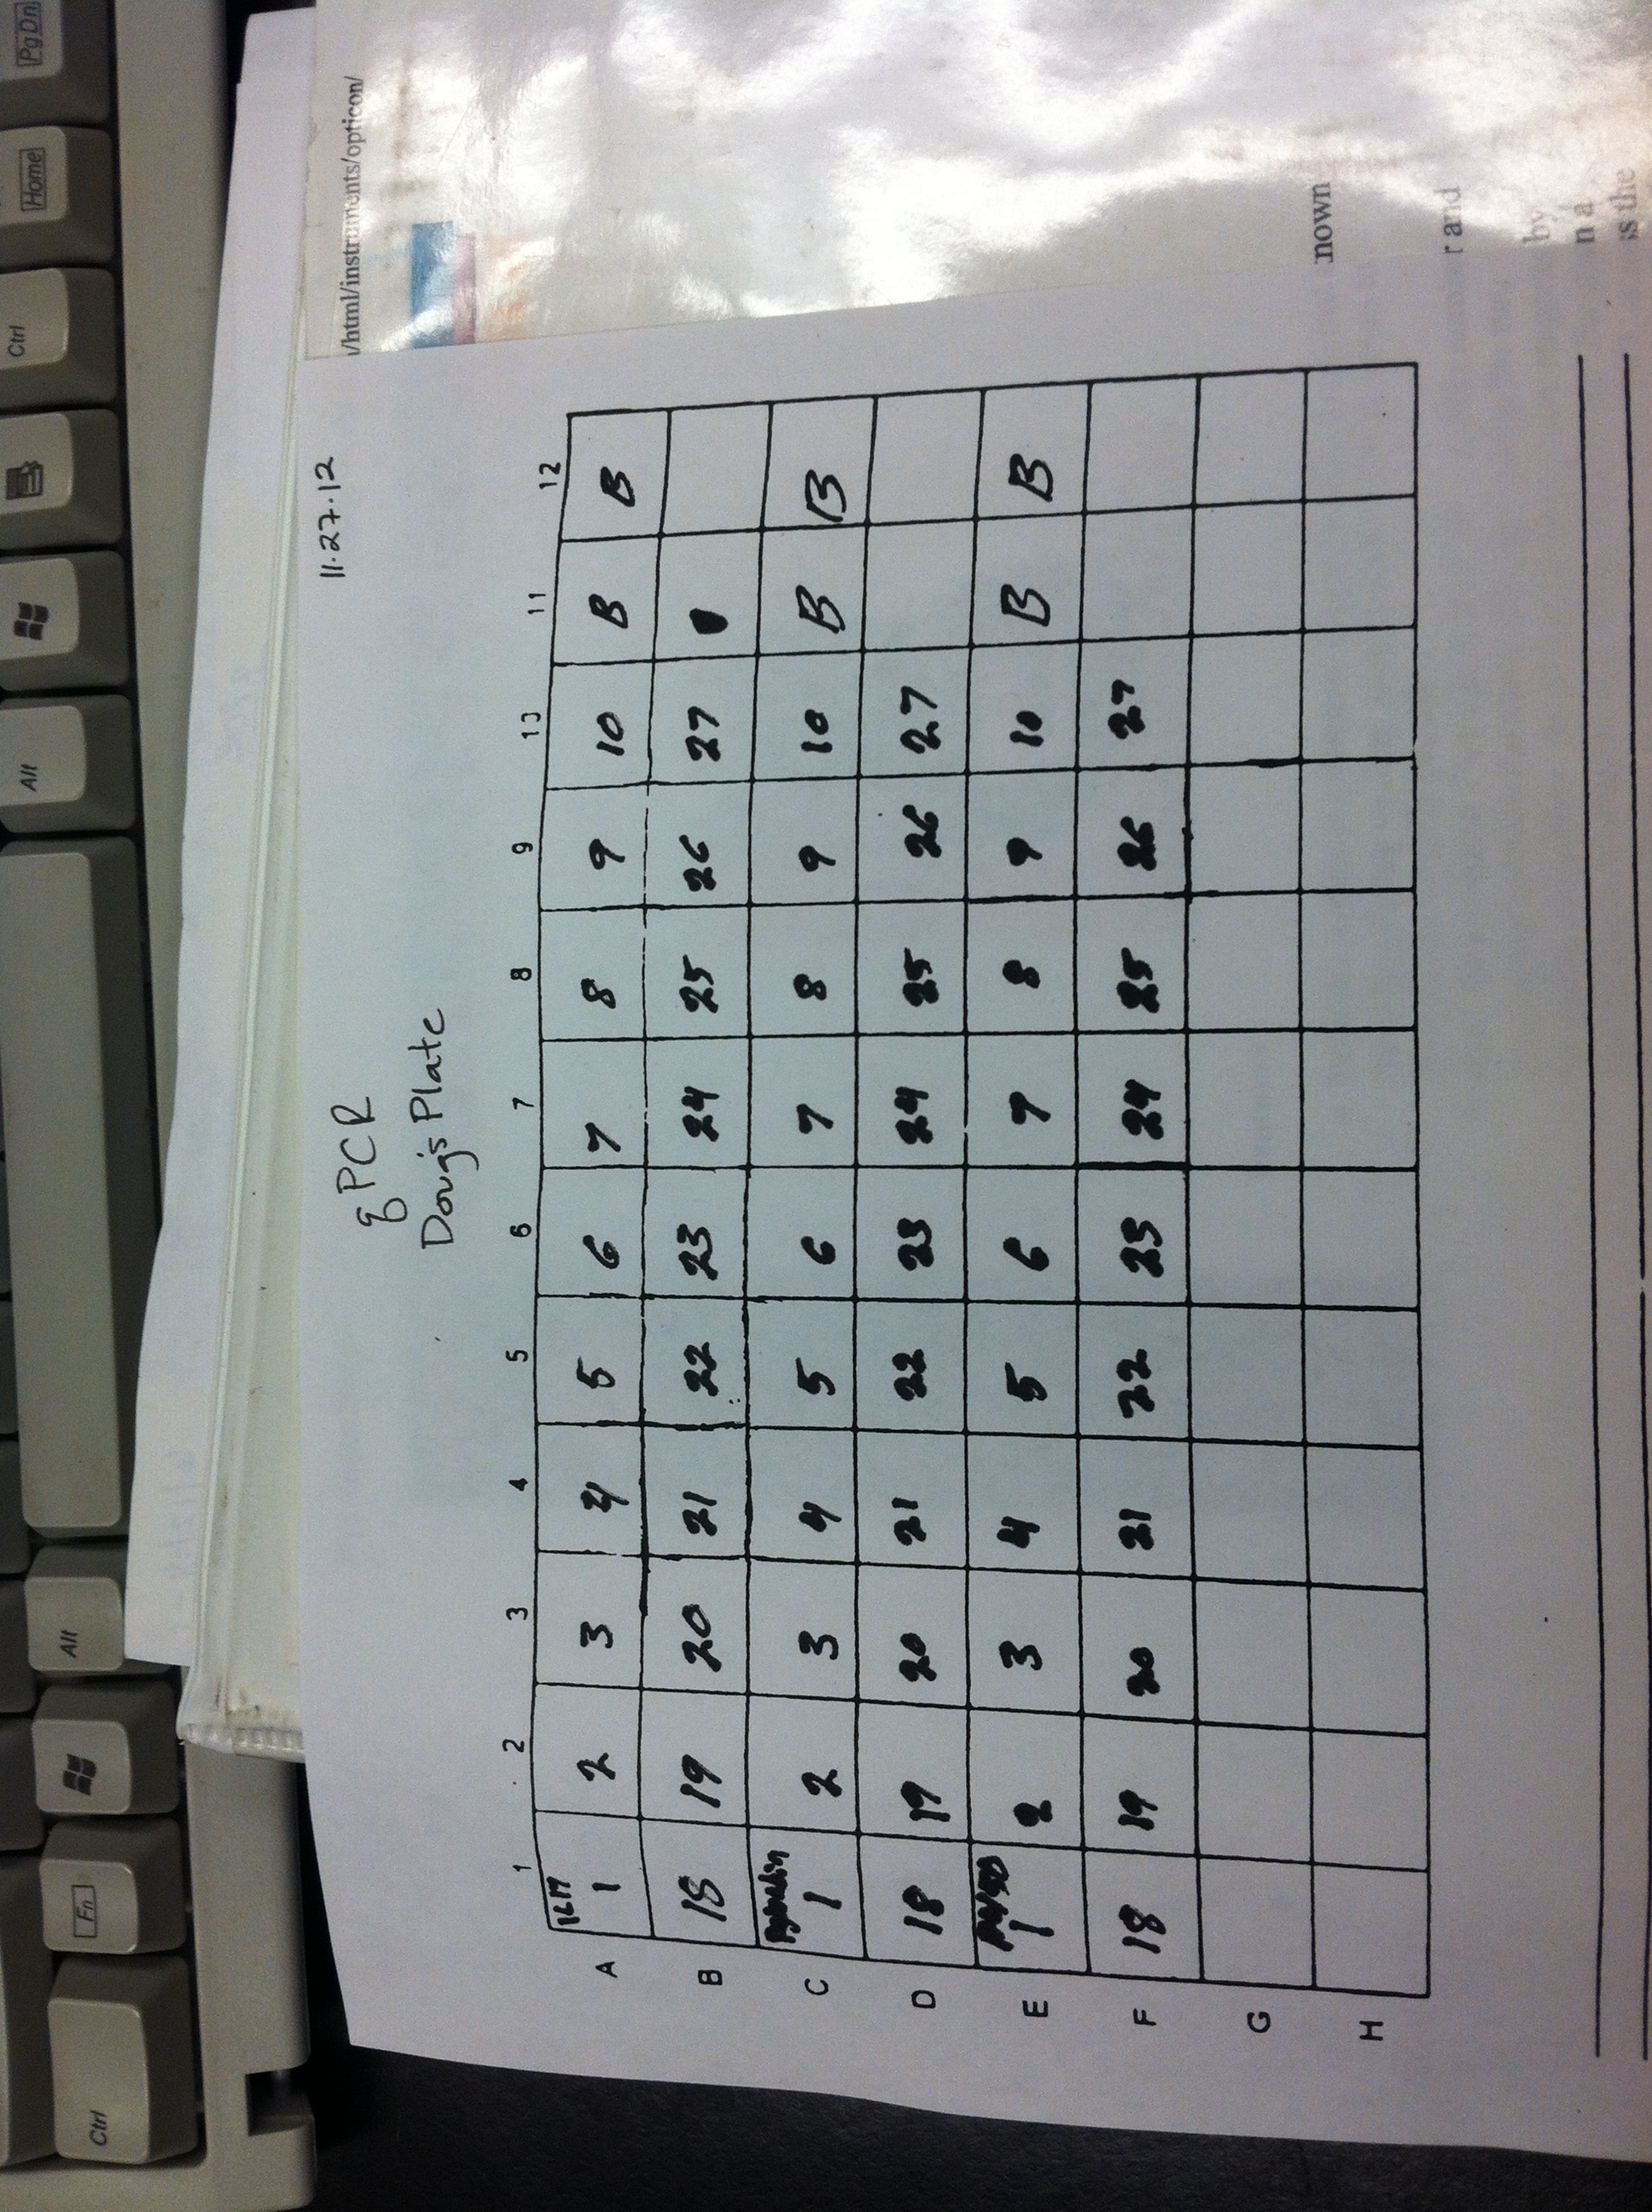
The CDNA was then analyzed by QPCR in a Biorad light cycler with a mastermix listed in table 1 and a run schedule of 95°C for 10 minutes 1 time for initial denaturation and then 39 repetitions of 95°C for 15 seconds to 55°C for 15 seconds and 72°C for 30 seconds and one repetition of 95°C for 10 seconds with a melt curve from 65°C to 95°C at0,5°C for 5 seconds. For IL-17 the forward and reverse primers were IL-17 ISO D-F (5’ GGTGGTGTGTAGCGTGATTG 3’) and IL-17 ISO D-R (3’ AACTCTTGGGGTCAGTGGTG 5’) respectively (Genbank Accession #EF190193). For the Prostaglandin E2 Receptor the forward and reverse primers were Pglandin E2-F (5’ ACCGAGAGTGCTGAGTGGTT 3’) and Pglandin E2-R (3’ GGCAAACTGTAAGCCAGGAG 5’) (Genbank Accession #EW777722). For the Cytochrome P450 the forward and reverse primers used were Cyp1A1-F (5’ AATTTCAAGTGGCCCGTGTGGT 3’) and Cyp1A1-R (3’ ATGCCATGCGCAGAGTCTCTTT 5’) (Genbank Accession #EW778340) (Roberts et al., 2009, 2008).
Results:
The data was analized using PCR MIner
| SampleNames: |
IL17_1 |
IL17_2 |
IL17_3 |
IL17_4 |
IL17_5 |
IL17_6 |
IL17_7 |
IL17_8 |
IL17_9 |
IL17_10 |
IL17_18 |
IL17_19 |
IL17_20 |
IL17_21 |
IL17_22 |
IL17_23 |
IL17_24 |
IL17_25 |
IL17_26 |
IL17_27 |
Pglndn_1 |
Pglndn_2 |
Pglndn_3 |
Pglndn_4 |
Pglndn_5 |
Pglndn_6 |
Pglndn_7 |
Pglndn_8 |
Pglndn_9 |
Pglndn_10 |
Pglndn_18 |
Pglndn_19 |
Pglndn_20 |
Pglndn_21 |
Pglndn_22 |
Pglndn_23 |
Pglndn_24 |
Pglndn_25 |
Pglndn_26 |
Pglndn_27 |
P450_1 |
P450_2 |
P450_3 |
P450_4 |
P450_5 |
P450_6 |
P450_7 |
P450_8 |
P450_9 |
P450_10 |
P450_18 |
P450_19 |
P450_20 |
P450_21 |
P450_22 |
P450_23 |
P450_24 |
P450_25 |
P450_26 |
P450_27 |
| R(0) |
2.99884E-08 |
4.05506E-08 |
4.35693E-08 |
1.2183E-07 |
2.2483E-07 |
8.95956E-08 |
4.19772E-08 |
4.44259E-08 |
5.93168E-08 |
3.75464E-09 |
7.25546E-08 |
9.19215E-08 |
8.52226E-08 |
1.60216E-07 |
1.06902E-07 |
1.58335E-07 |
9.79212E-07 |
8.42656E-07 |
2.47364E-06 |
5.31792E-07 |
3.80769E-09 |
8.35419E-09 |
5.74807E-09 |
5.20447E-08 |
4.70883E-08 |
3.19818E-08 |
8.07547E-09 |
5.85606E-09 |
2.0038E-08 |
6.2336E-10 |
1.90887E-08 |
1.98439E-08 |
3.20844E-09 |
3.52118E-08 |
1.44014E-08 |
1.17278E-07 |
3.11352E-07 |
2.35489E-07 |
1.21284E-06 |
9.67975E-08 |
#VALUE! |
6.74698E-12 |
#VALUE! |
#VALUE! |
#VALUE! |
6.4624E-12 |
6.86292E-12 |
6.98685E-12 |
6.52235E-12 |
#VALUE! |
#VALUE! |
7.52742E-12 |
9.40316E-12 |
#VALUE! |
#VALUE! |
#VALUE! |
#VALUE! |
6.35959E-12 |
8.19737E-12 |
7.71233E-12 |
| Normalizing R(0) |
CgEf1a_1 |
CgEf1a_2 |
CgEf1a_3 |
CgEf1a_4 |
CgEf1a_5 |
CgEf1a_6 |
CgEf1a_7 |
CgEf1a_8 |
CgEf1a_9 |
CgEf1a_10 |
CgEf1a_18 |
CgEf1a_19 |
CgEf1a_20 |
CgEf1a_21 |
CgEf1a_22 |
CgEf1a_23 |
CgEf1a_24 |
CgEf1a_25 |
CgEf1a_26 |
CgEf1a_27 |
CgEf1a_1 |
CgEf1a_2 |
CgEf1a_3 |
CgEf1a_4 |
CgEf1a_5 |
CgEf1a_6 |
CgEf1a_7 |
CgEf1a_8 |
CgEf1a_9 |
CgEf1a_10 |
CgEf1a_18 |
CgEf1a_19 |
CgEf1a_20 |
CgEf1a_21 |
CgEf1a_22 |
CgEf1a_23 |
CgEf1a_24 |
CgEf1a_25 |
CgEf1a_26 |
CgEf1a_27 |
CgEf1a_1 |
CgEf1a_2 |
CgEf1a_3 |
CgEf1a_4 |
CgEf1a_5 |
CgEf1a_6 |
CgEf1a_7 |
CgEf1a_8 |
CgEf1a_9 |
CgEf1a_10 |
CgEf1a_18 |
CgEf1a_19 |
CgEf1a_20 |
CgEf1a_21 |
CgEf1a_22 |
CgEf1a_23 |
CgEf1a_24 |
CgEf1a_25 |
CgEf1a_26 |
CgEf1a_27 |
| 3.88723E-05 |
6.83103E-05 |
5.7771E-05 |
3.2135E-05 |
6.79746E-05 |
1.13463E-05 |
1.85774E-05 |
6.18925E-05 |
3.43697E-05 |
8.28294E-06 |
0.000150314 |
0.000120206 |
0.000264525 |
0.000243545 |
0.000302142 |
4.15755E-05 |
4.14745E-05 |
9.02104E-05 |
0.000107389 |
0.000180259 |
3.88723E-05 |
6.83103E-05 |
5.7771E-05 |
3.2135E-05 |
6.79746E-05 |
1.13463E-05 |
1.85774E-05 |
6.18925E-05 |
3.43697E-05 |
8.28294E-06 |
0.000150314 |
0.000120206 |
0.000264525 |
0.000243545 |
0.000302142 |
4.15755E-05 |
4.14745E-05 |
9.02104E-05 |
0.000107389 |
0.000180259 |
3.88723E-05 |
6.83103E-05 |
5.7771E-05 |
3.2135E-05 |
6.79746E-05 |
1.13463E-05 |
1.85774E-05 |
6.18925E-05 |
3.43697E-05 |
8.28294E-06 |
0.000150314 |
0.000120206 |
0.000264525 |
0.000243545 |
0.000302142 |
4.15755E-05 |
4.14745E-05 |
9.02104E-05 |
0.000107389 |
0.000180259 |
| Normalized Gene expression |
0.000771458 |
0.000593623 |
0.000754172 |
0.003791208 |
0.003307563 |
0.007896469 |
0.002259582 |
0.000717792 |
0.001725847 |
0.000453297 |
0.000482687 |
0.000764697 |
0.000322172 |
0.000657849 |
0.000353813 |
0.003808361 |
0.02360996 |
0.009341005 |
0.023034442 |
0.00295016 |
9.79537E-05 |
0.000122298 |
9.94975E-05 |
0.001619564 |
0.000692734 |
0.0028187 |
0.000434693 |
9.46165E-05 |
0.000583014 |
7.52583E-05 |
0.000126992 |
0.000165082 |
1.21291E-05 |
0.00014458 |
4.76644E-05 |
0.002820838 |
0.00750706 |
0.002610436 |
0.011293964 |
0.000536992 |
#VALUE! |
9.87697E-08 |
#VALUE! |
#VALUE! |
#VALUE! |
5.6956E-07 |
3.69423E-07 |
1.12887E-07 |
1.8977E-07 |
#VALUE! |
#VALUE! |
6.26208E-08 |
3.55473E-08 |
#VALUE! |
#VALUE! |
#VALUE! |
#VALUE! |
7.04974E-08 |
7.63337E-08 |
4.27848E-08 |
| IL17 |
Control |
Treatment |
| Average |
0.002227101 |
0.006532515 |
| Standard dev. |
0.002318739 |
0.00926894 |
| T test |
0.08563843 |
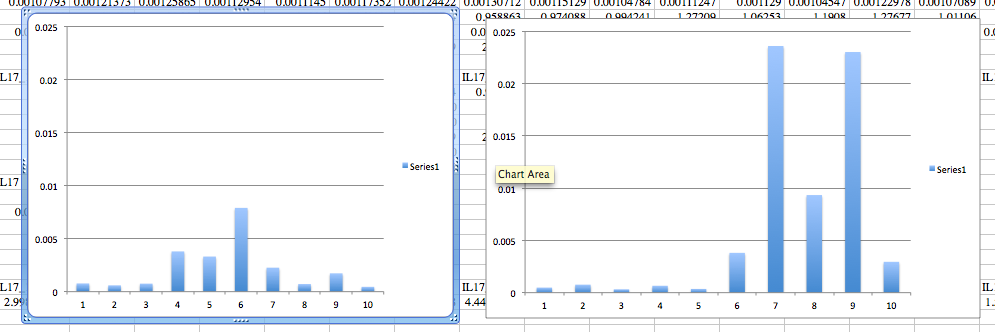
The Left is the control gene expression and the Right is the treatment group
| Pglandin E2 |
Control |
Treatment |
| Average |
0.000663833 |
0.002526574 |
| Standard dev. |
0.000895615 |
0.003875857 |
| T test |
0.077979495 |

Again the left is control and the right is treatment group
There was really no response the the P450 gene
Reflections:
There is a trend in the data that suggests an increase in gene expression of IL-17 and Pglandin E2 receptor though the data is not statistically significant.
Some underlying sources of variance include a low number of samples, not quantifying and standardizing the amount of RNA used to create CDNA, not running the normalizing gene at the same time as the samples on the same plate, not running samples in duplicate, and not using DNAse on the samples to remove DNA carryover. If a study is done with an increased number of samples and with the aforementioned issues taken into account it is likely that there will be an increase in expression of the innate immune markers of C. Gigas.
There was no expression in either the controls or the treatment group of the gene Cytochrome p450. This coupled with the increase in expression of the innate immune genes suggests that the exposure of C. Gigas to cyclodextrin does not initiate a xenobiotic response.
This was a very valuable exercise and has taught me alot about molecular techniques that can be used in gene expression analysis.
Project Nov 20 2012
Objective:
Finish RNA extraction quantify RNA from each group of extractions and get samples ready for rtPCR to create cDNA
Methods:
1. measure .020-.030 g of gil sample from each specimen and put into 1.5 ml flip cap tube 500 µL trireagent into each tube with tissue sample and homogenize with pestel in tube
2. add 500 µL trireagent to tube and votrex for 15 seconds
3. place all but 7 in freezer
4. add 200 µL chloroform to each tube and vortex for 30 sec
5. Incubate tube at RT for 5 mins.
6. Spin tube in refrigerated microfuge for 15 mins. @ max speed.
7. Gently remove tube from microfuge. Be sure not to disturb the tube.
8. Slowly and carefully transfer most of the aqueous phase (the top, clear portion) to a fresh microfuge tube. Do NOT transfer ANY of the interphase (the white, cell debris between the aqueous and organic phase).
9. Close the tube containing the organic and interphase and properly dispose of the liquid inside the tube as well as the tube itself at the end of the lab.
10. Add 500uL isopropanol to the new tube containing your RNA and close the tube.
11. Mix by inverting the tube numerous times until the solution appears uniform. Pay particular attention to the appearance of the solution along the edge of the tube. If mixed properly, it should no longer appear viscous/"lumpy".
12. Incubate at RT for 10 mins.
13. Spin in refrigerated microfuge at max speed for 8 mins. When placing your tube in the microfuge position the tube hinge pointing up, away from the center of the microfuge.
14. A small, white pellet (RNA and salts) should be present. If not, do not fret an continue with the procedure.
15. Remove supernatant.
16. Add 1mL of 75% EtOH to pellet. Close tube and vortex briefly to dislodge pellet from the side of the tube. If the pellet does not become dislodged, that is OK.
17. Spin in refrigerated microfuge at 7500g for 5mins. ran at 7600 because 7500 was not an option
18. Carefully remove supernatant. Pellet may be very loose. Make sure not to remove pellet!
19. Briefly spin tube (~15s) to pool residual EtOH.
20. Using a small pipette tip (P10 or P20 tips), remove remaining EtOH.
21. Leave tube open and allow pellet to dry at RT for no more than 5mins.
22. Resuspend pellet in 100uL of 0.1%DEPC-H2O by pipetting up and down until pellet is dissolved.
23. Incubated tube at 55C for 5mins. to help solubilize RNA.
24. Remove tube from heat, flick a few times to mix and place sample on ice. This will be your stock RNA sample.
25. Quantitate RNA yield using Nanodrop spectrophotometer.
Today I got done 15 samples.
I decided to run with everyone else since RNA is not easily transferable after solubilized into H2O
I quantified RNA with nanodrop of two RNA samples
P2
260/280 1.89
260/230 1.57
ng/ul 267.4
p25
260/280 1.88
260/230 1.92
ng/ul 239.8
Then placed 17.75 ul of 10 cyclodextrin samples into wells for rtPCR to cDNA and saved RNA in -80 freezer
I also set up working solutions for my primers
cyp1a1
il17
prostiglandin e2 receptor
Project Nov 13 2012
Objective:
RNA extraction to the etoh stage up to 30 samples
Setup
30 samples 15 control pacific oysters 15 cyclodextrin treated
gill tissue
Methods:
1. measure .020-.030 g of gil sample from each specimen and put into 1.5 ml flip cap tube 500 µL trireagent into each tube with tissue sample and homogenize with pestel in tube
2. add 500 µL trireagent to tube and votrex for 15 seconds
3. place all but 7 in freezer
4. add 200 µL chloroform to each tube and vortex for 30 sec
5. Incubate tube at RT for 5 mins.
6. Spin tube in refrigerated microfuge for 15 mins. @ max speed.
7. Gently remove tube from microfuge. Be sure not to disturb the tube.
8. Slowly and carefully transfer most of the aqueous phase (the top, clear portion) to a fresh microfuge tube. Do NOT transfer ANY of the interphase (the white, cell debris between the aqueous and organic phase).
9. Close the tube containing the organic and interphase and properly dispose of the liquid inside the tube as well as the tube itself at the end of the lab.
10. Add 500uL isopropanol to the new tube containing your RNA and close the tube.
11. Mix by inverting the tube numerous times until the solution appears uniform. Pay particular attention to the appearance of the solution along the edge of the tube. If mixed properly, it should no longer appear viscous/"lumpy".
12. Incubate at RT for 10 mins.
13. Spin in refrigerated microfuge at max speed for 8 mins. When placing your tube in the microfuge position the tube hinge pointing up, away from the center of the microfuge.
14. A small, white pellet (RNA and salts) should be present. If not, do not fret an continue with the procedure.
15. Remove supernatant.
16. Add 1mL of 75% EtOH to pellet. Close tube and vortex briefly to dislodge pellet from the side of the tube. If the pellet does not become dislodged, that is OK.
At this point place in -80 and repeat with next 7-8 samples
I got 15 samples done to the etoh stage and 15 to the trireagent stage and all were place into the -80 to be finished next week.
Results: no results for project but I saw the results for the qPCR of the sample gill tissue
My blanks yielded no expression which is good. my sample a for cDNA had no expression and the second cDNA sample had very little expression right near the end of the cycles. This could be very little expression or not enough RNA in my sample to be amplified. my quant value was good so I assume it is the first explanation Another explanation is my primers that I designed were not good. I did have expression within the Genomic DNA as expected.
There was only one peak in the melt curve so that is positive and states that only one gene was amplified.
Reflection:
This has been really fun being able to work on samples that I am really interested in finding out what is being expressed due to the treatment.
I would like more information on how to normalize our RNA with the nano drop quantification. that was all a bit confusing.
Lab 7 Nov 6 2012
Lab Objectives:
Run a gel for our cPCR reaction, Run a protein gel and do a western blot.
Methods:
SDS-PAGE PROTOCOL
Also see Manufacturers Protocol / Manual: Precise™ Protein Gels
- Begin boiling water on hot plate.
- In a fresh, 1.5mL SCREW CAP tube add 15uL of your protein stock and 15uL of 2X Reducing Sample Buffer. Return your protein stock to the box in the -20C freezer labeled protein samples.
- Mix sample by flicking. Briefly centrifuge (10s) to pool liquid in bottom of tube.
- Boil sample for 5 mins.
- While sample is boiling, observe assembly of gel box and gels. Rinse gel wells thoroughly as demonstrated.
- When sample is finished boiling, immediately centrifuge for 1min. to pool liquid.
- Slowly load your entire sample into the appropriate well using a gel loading tip.
- we used the Seeblue Plus 2 ladder from invitrogen
- Put lid on gel box and plug electrodes into appropriate receptacles on the power supply.
- Turn power supply on and set voltage to 150V. Run for 30mins.
- Turn off power supply and disconnect gel box from power supply.
- Remove lid from gel box.
- Disengage the tension wedge.
- Remove gel from gel box.
- Carefully crack open cassette to expose gel.
- Trim wells at top of gel.
- Notch a designated corner of the gel to help you remember the correct orientation of the gel (i.e. which is the top/bottom of the gel, which is the right/left side(s) of the gel)
- Proceed to Western Blotting protocol.
Western Blot Protocol
This is a lengthy protocol with many incubation steps. There will be one gel for the entire class. As a class, you should assign yourselves steps so that everyone can participate and so that we don't waste time. When it is not your turn to attend to the gel, you can do protein and RNA extractions for your project.
- Soak the filter paper (need two for each side of each gel), membrane and gel in Tris-Glycine Transfer Buffer for 15 minutes.
- Anode (+++)
- filter paper
- membrane
- gel
- filter paper
- cathode (---)
- Transfer the blot for 30 minutes at 20V
- Remove the gel from the sandwich and rinse off adhering pieces of gel with transfer buffer. cut the top left corner to determine what bands are for what sample. also mark top left corner of membrane
- Wash membrane 2 times, for 5 minutes each, with 20 mL of pure water.
- Put the membrane in the plastic box and add 10 mL of Blocking Solution. Cover and incubate overnight on a rotary shaker set at 1 revolution/second.
- Your TA will do the rest of the steps. After class tomorrow you can come and see your results.
- Decant liquid.
- Rinse the membrane with 20 mL of water for 5 minutes, then decant. Repeat.
- Incubate the membrane in 10 mL of Primary Antibody Solution. Decant the solution.
- Rinse the membrane with 20 mL of Antibody Wash for 5 minutes, then decant. Repeat 3 times.
- Incubate the membrane in 10 mL of Secondary Antibody Solution for 30 minutes. Decant.
- Wash the membrane for 5 minutes with 20 mL of Antibody wash, then decant. Repeat 3 times.
- Rinse the membrane with 20 mL of pure water for 2 minutes, then decant. Repeat twice.
- Incubate the membrane in 5 mL of Chromogenic Substrate until a purple band appears. This will occur between 1-60 minutes after adding the Chromogenic Substrate.
- Dry the membrane on a clean piece of filter paper to the open air.
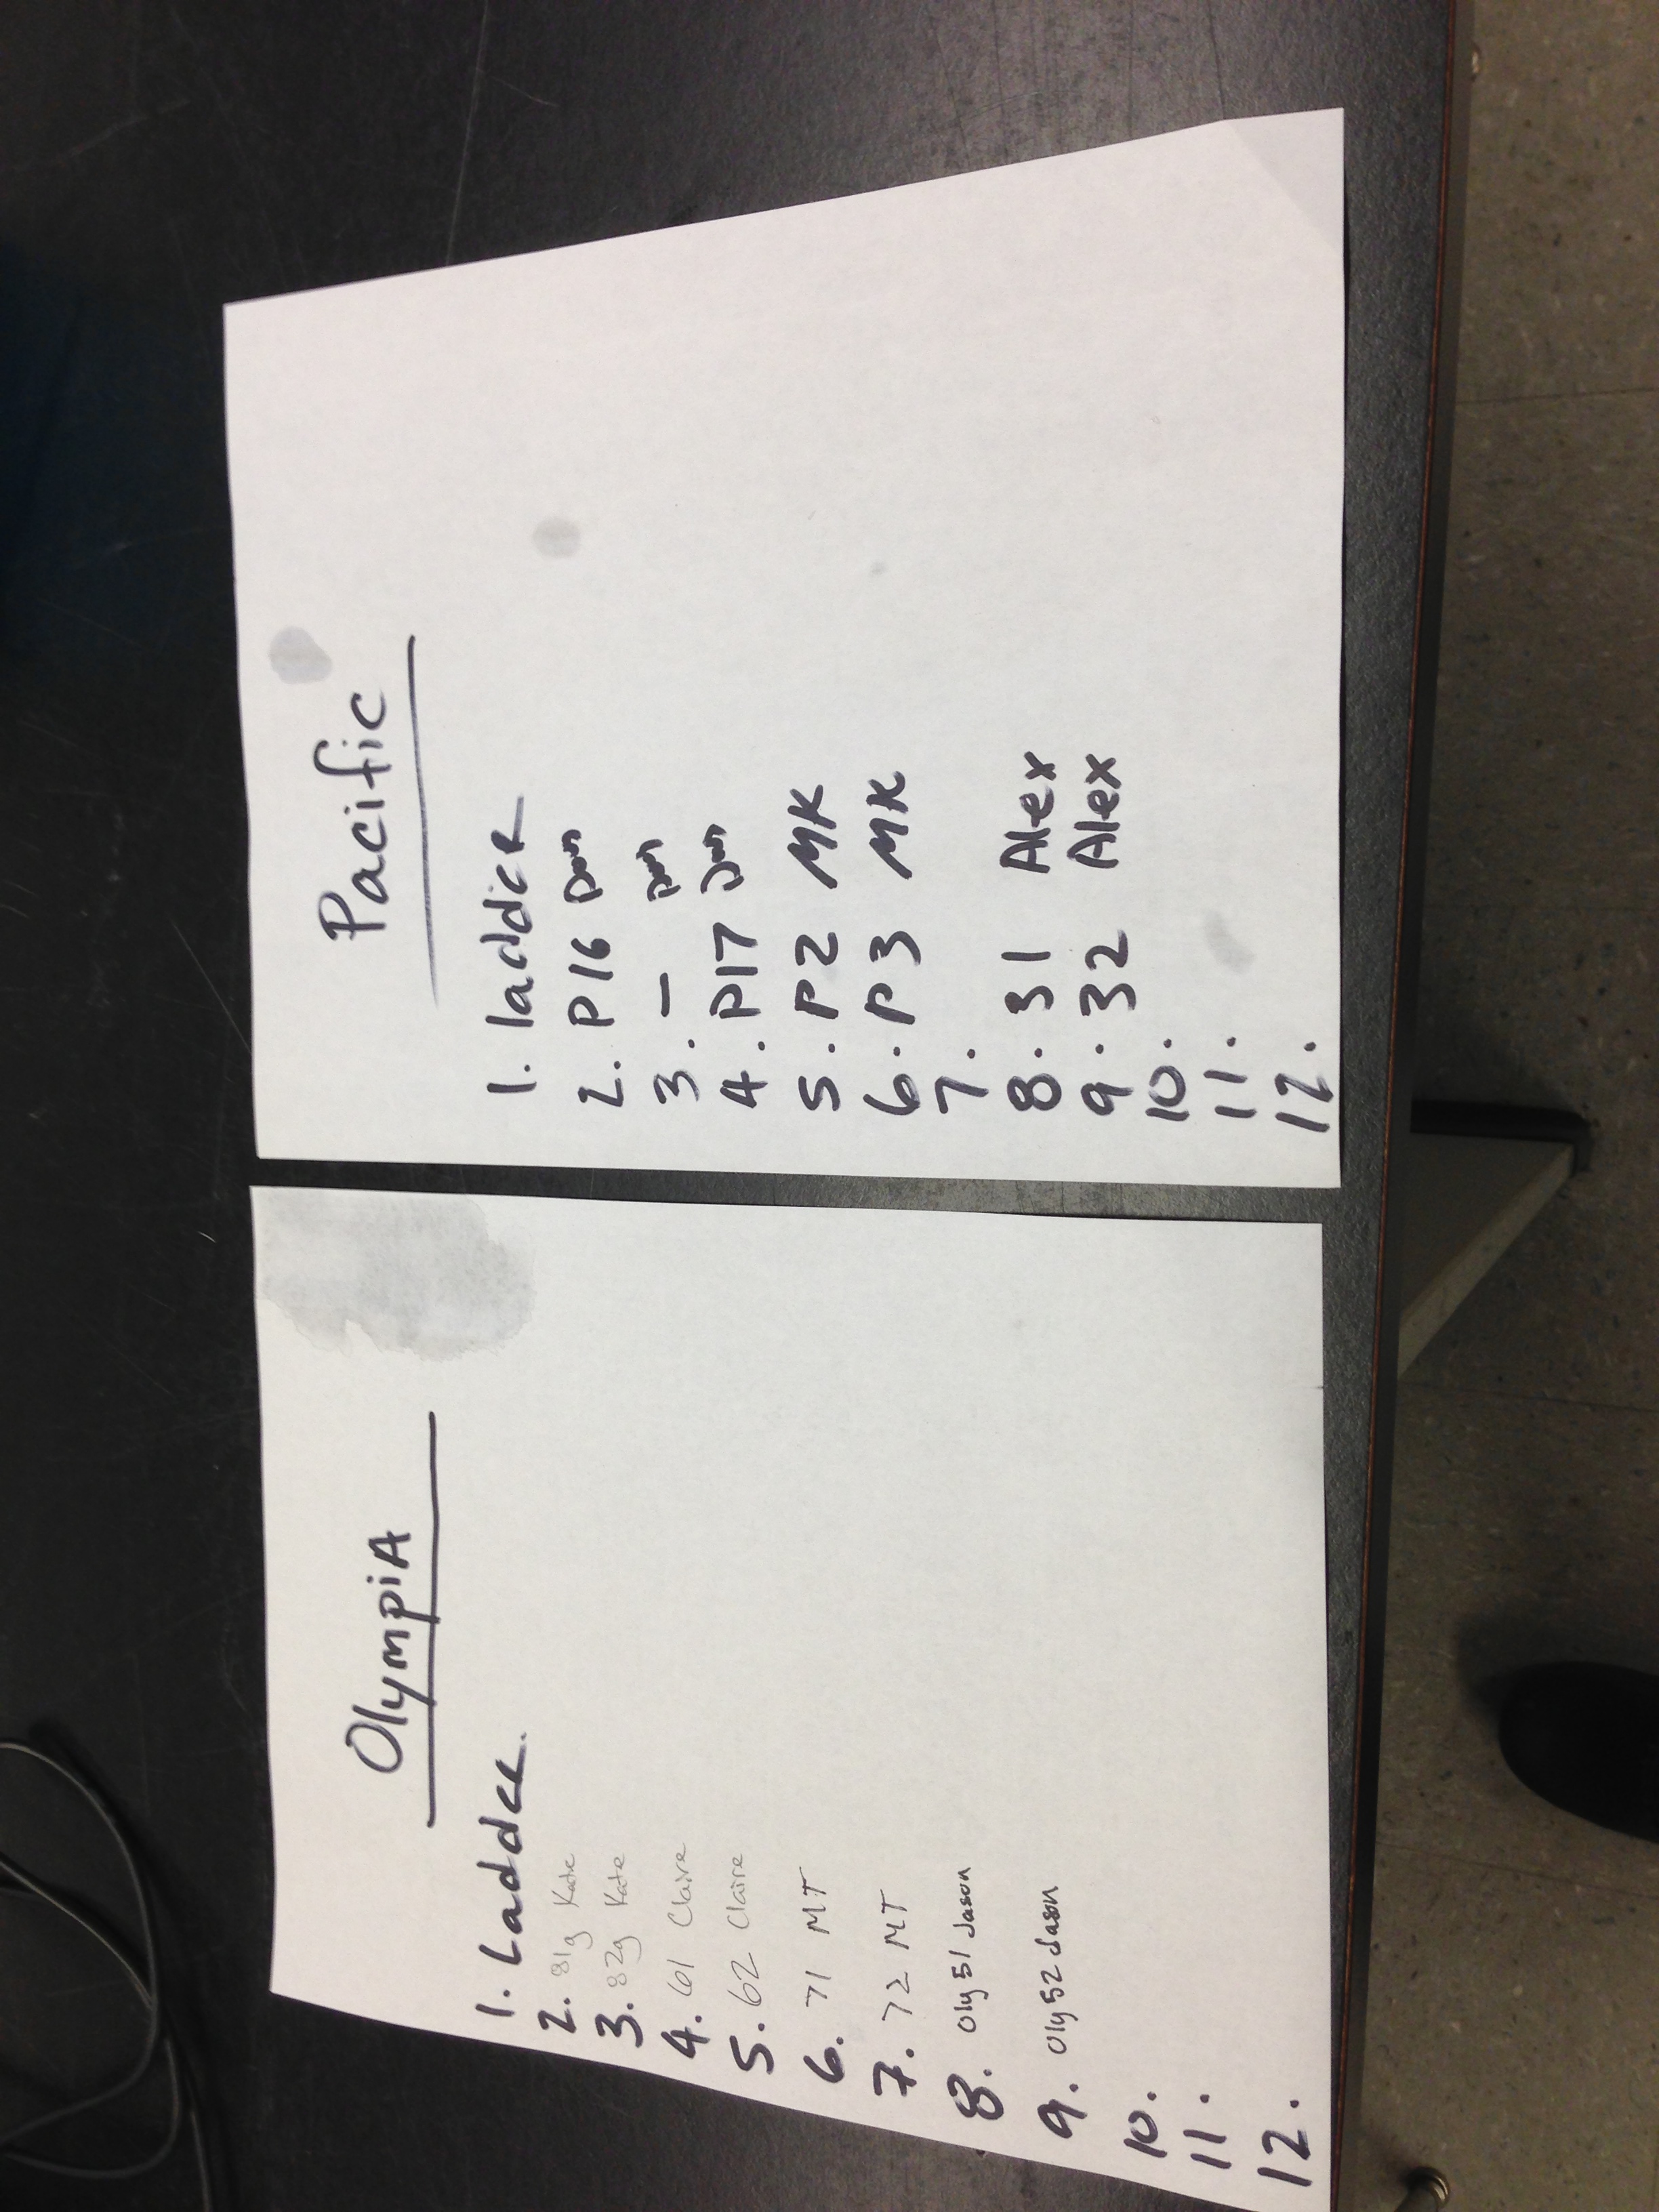
After I left the TA performed the following protocol
1. Place the membrane in 10 ml of the appropriate Blocking Solution in a covered, plastic dish provided in the kit. Incubate for 30 minutes on a rotary shaker set at 1 revolution/sec. Decant the Blocking Solution.
2. Rinse the membrane with 20 ml of water for 5 minutes, then decant. Repeat once.
3. Incubate the membrane with 10 ml of Primary Antibody Solution (1:3000 dilution) overnight, then decant.
4. Wash the membrane for 5 minutes with 20 ml of prepared Antibody Wash, then decant. Repeat 3 times.
5. Incubate the membrane in 10 ml of Secondary Antibody Solution for 30 minutes, then decant.
6. Wash the membrane for 5 minutes with 20 ml of Antibody Wash, then decant. Repeat 3 times.
7. Rinse the membrane with 20 ml of water for 2 minutes, then decant. Repeat twice.
8. Incubate the membrane in 5 ml of Chromogenic Substrate until purple bands develop on the membrane. Development is complete in 1 to 60 minutes.
9. Rinse the membrane with 20 ml of water for 2 minutes. Repeat twice.
10. Dry the membrane on a clean piece of filter paper to open air, by a stream of slightly warm air, or under an infrared lamp
Results:
Waiting on results for gel and western blot. Preliminary die showed presence of some proteins but no further information yet.
Prepared before class:
AGAROSE GEL POURING PROCEDURE
- Weigh 2g of agarose and mix with 150mL 1x TAE in a 1L flask
- Microwave solution for ~ 3 minutes. Keep an eye on the solution so that it does not boil over. You want the solution to be clear - no precipitate and no bubbles.
- Cool solution (you should be able to touch the flask for a few seconds), then add 12uL ethidium bromide(EtBr). WARNING: EtBr is a carcinogen be sure to wear gloves and appropriately dispose tip waste.
- Mix thoroughly by swirling, then pour into gel tray.
- Add gel combs. Using a clean pipet tip, pop any bubbles that could get in the way of your PCR product.
- After gel is set, wrap in plastic wrap (label with your initials and date) and place gel in the fridge if not using immediately.
ELECTROPHORESIS PROCEDURE
- Place gel in gel box and fill with 1x TAE buffer (to fully cover wells)
- Remove combs from wells
- Load 7uL 100bp ladder in far left lane
- Load 20uL of your PCR sample into the gel (retain the remaining vol at -20ºC)
- Run gel at ~ 100V for ~ 1hr
- Visualize the gel on the UV transilluminator
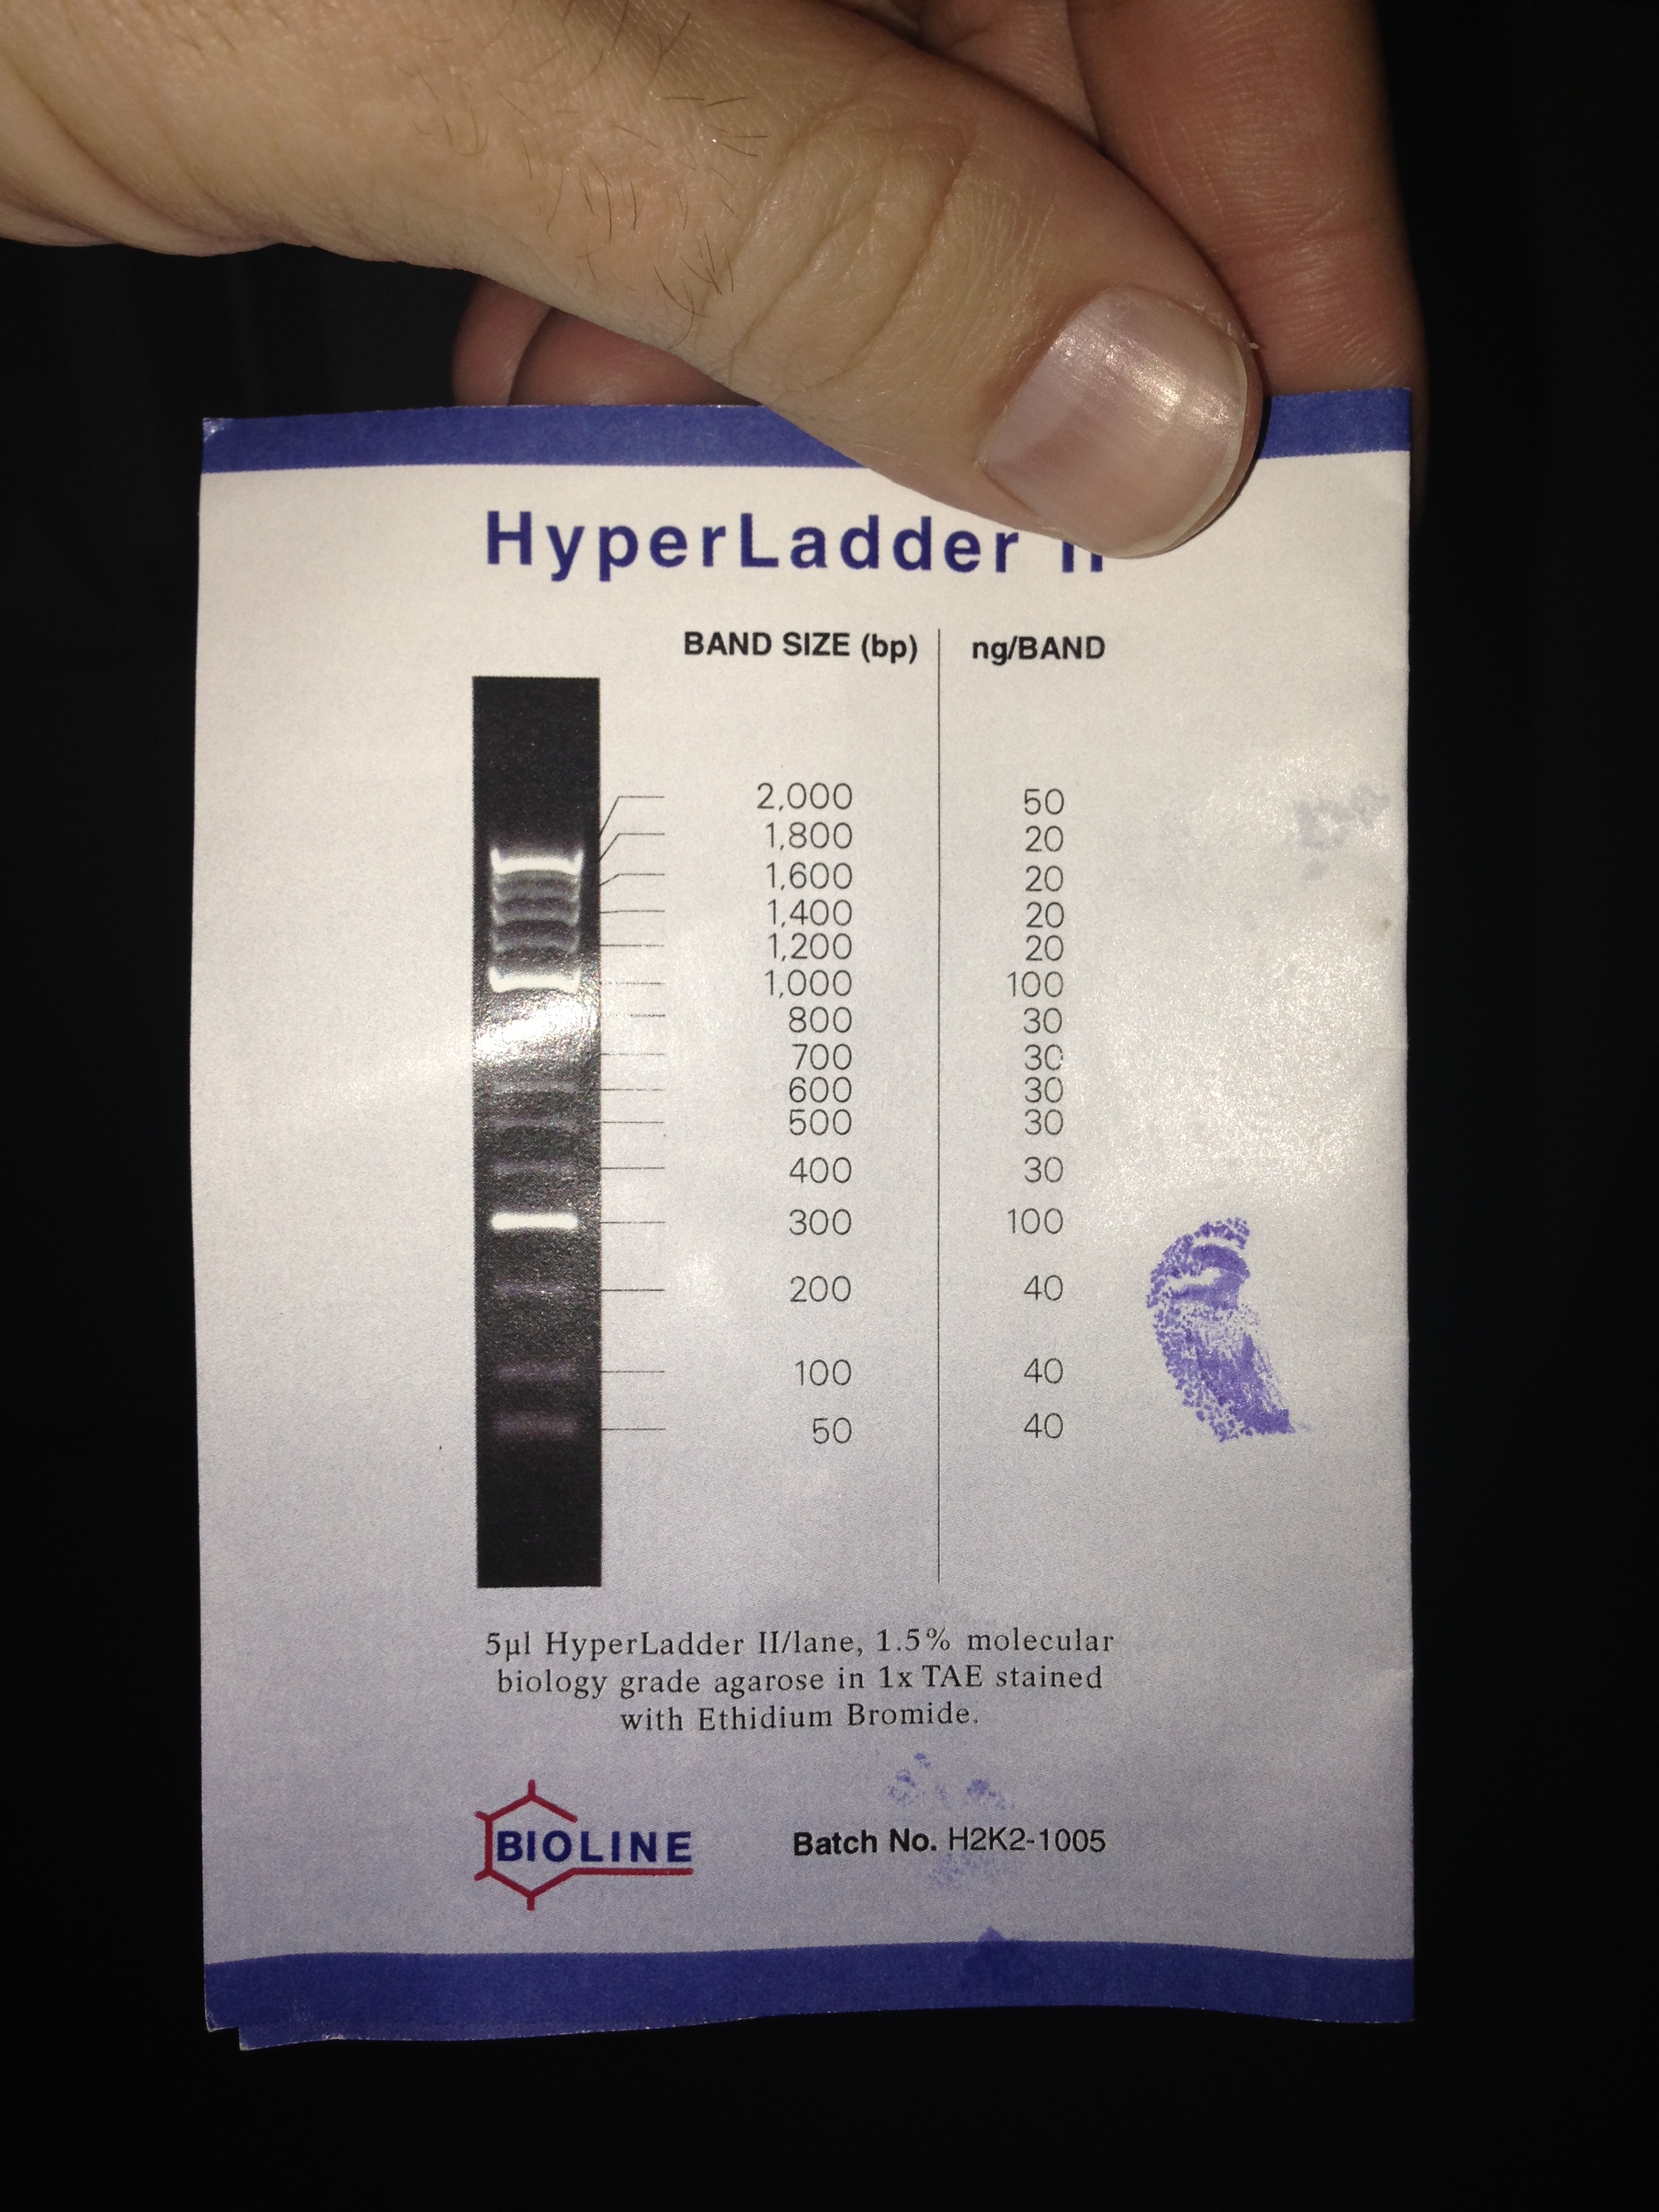
For the electrophoresis we used a Hyperladder II from Bioline pictured below
Results:
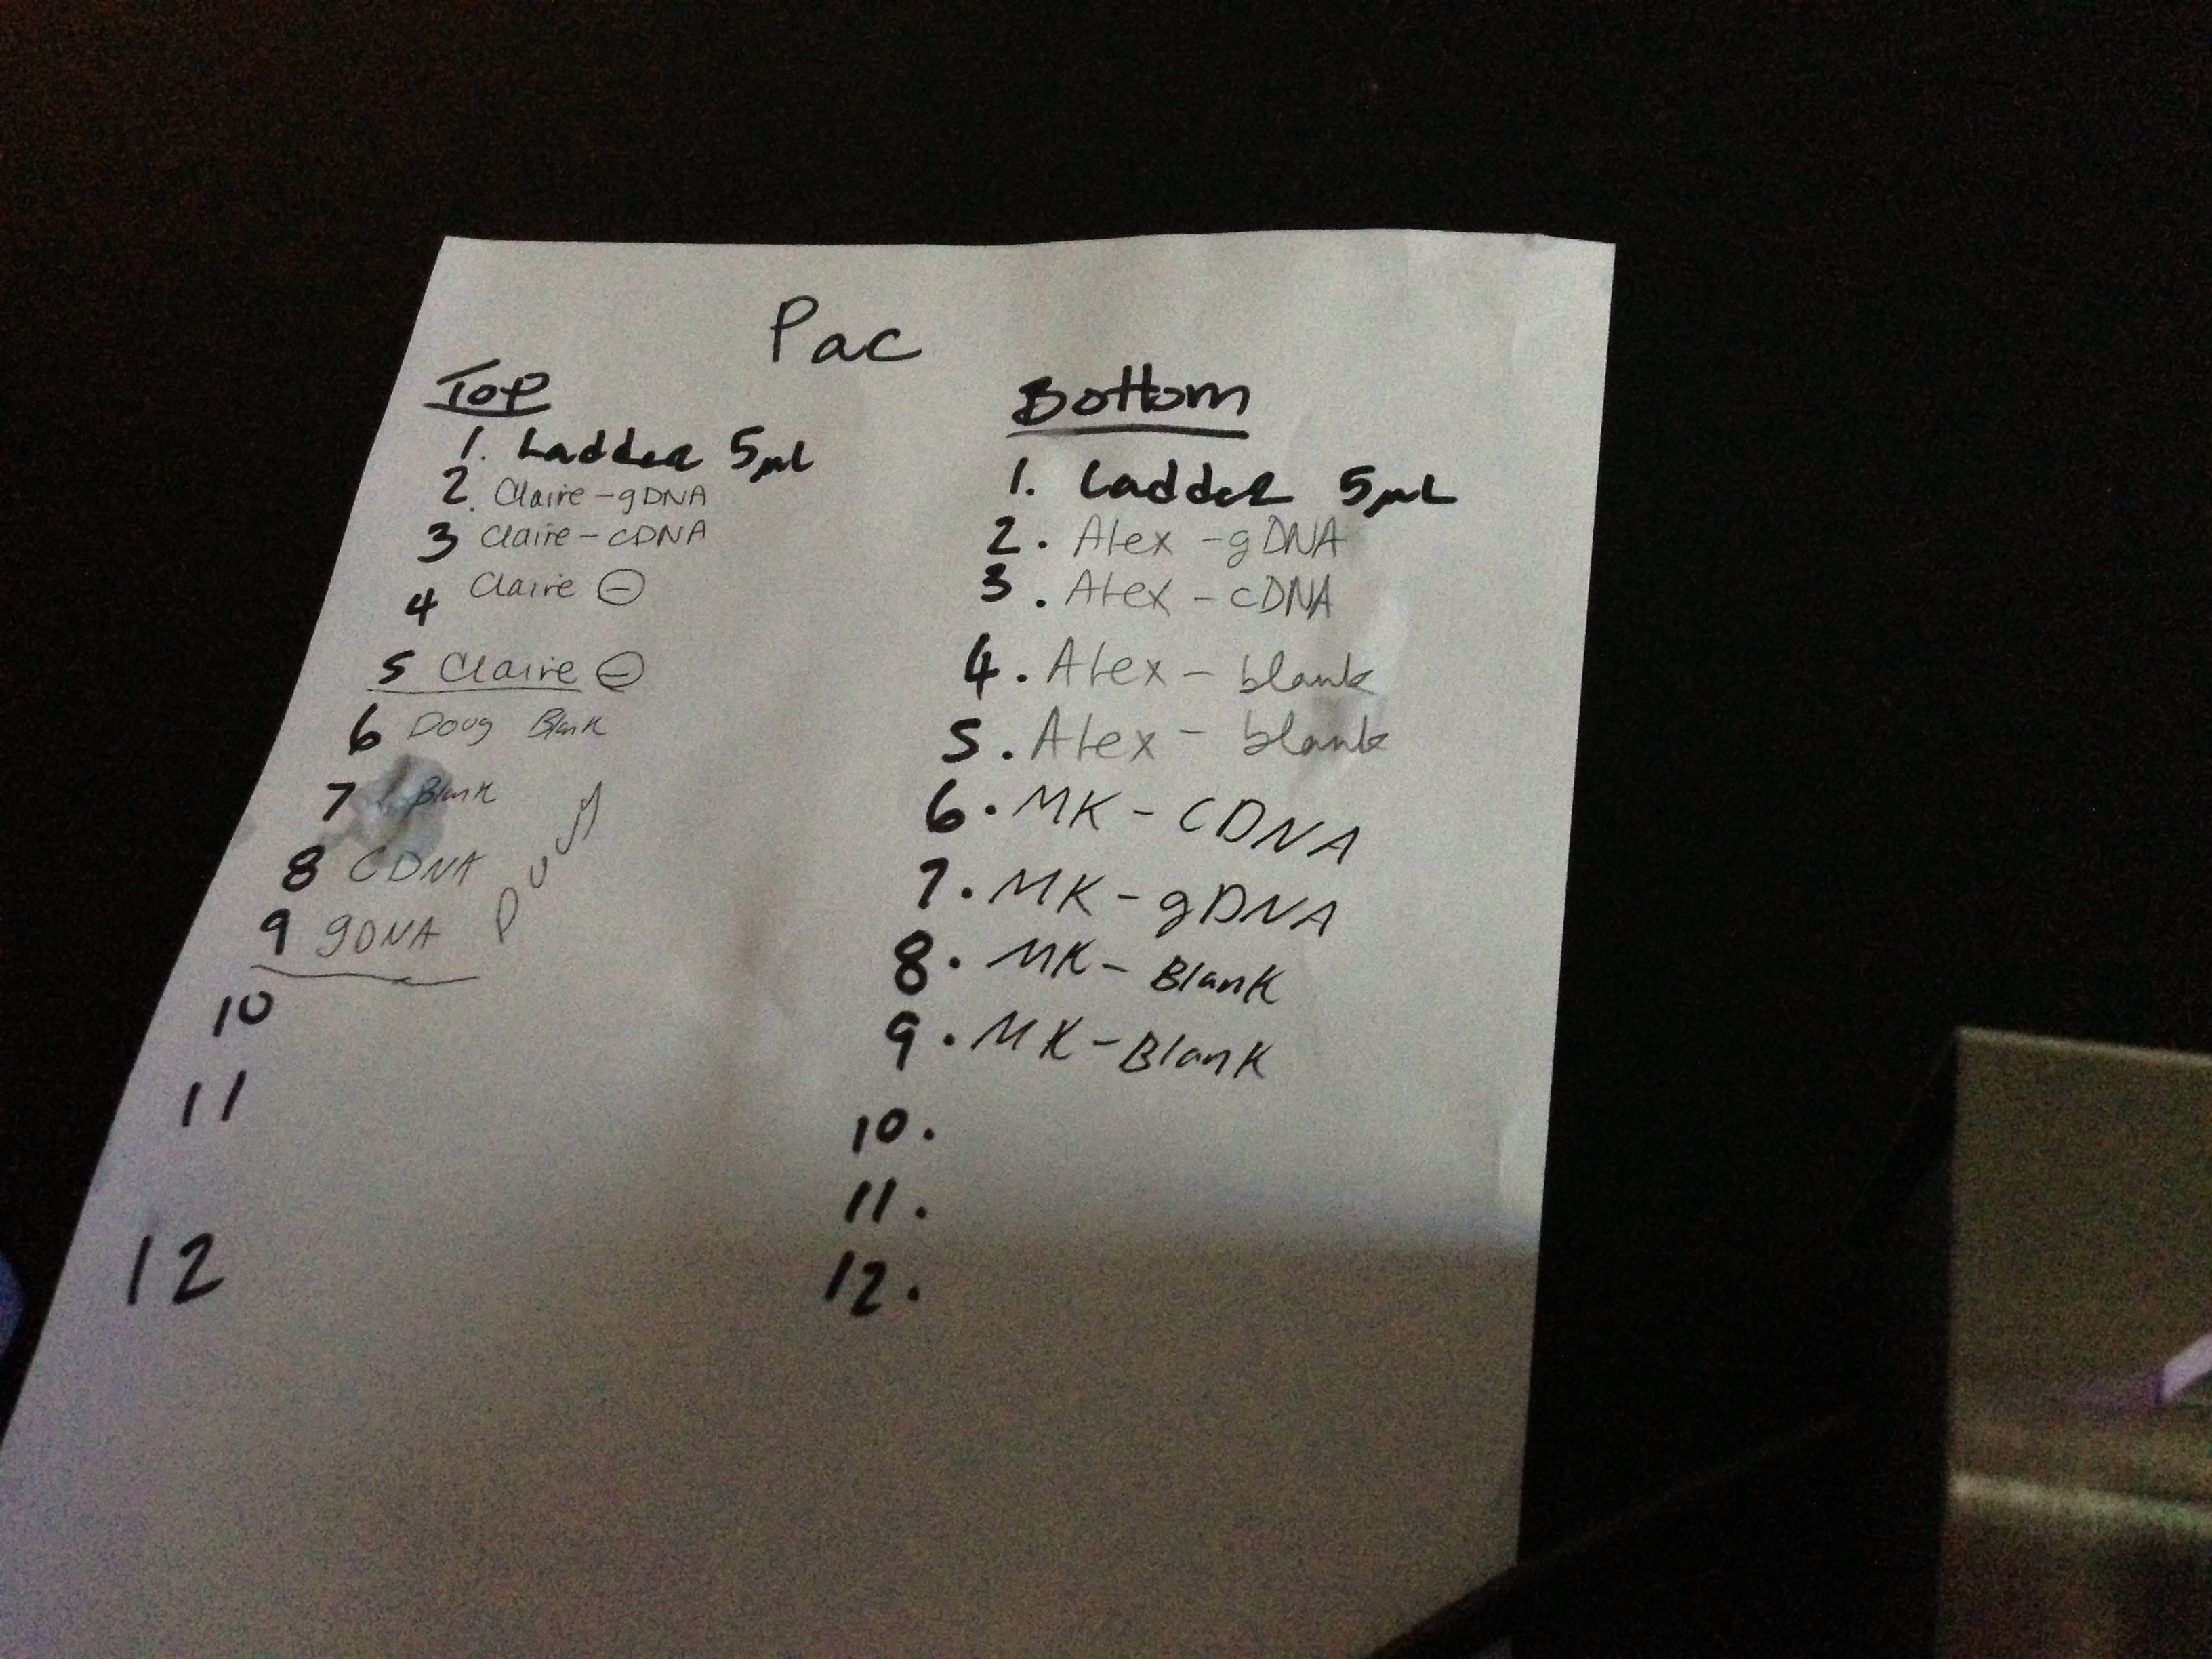
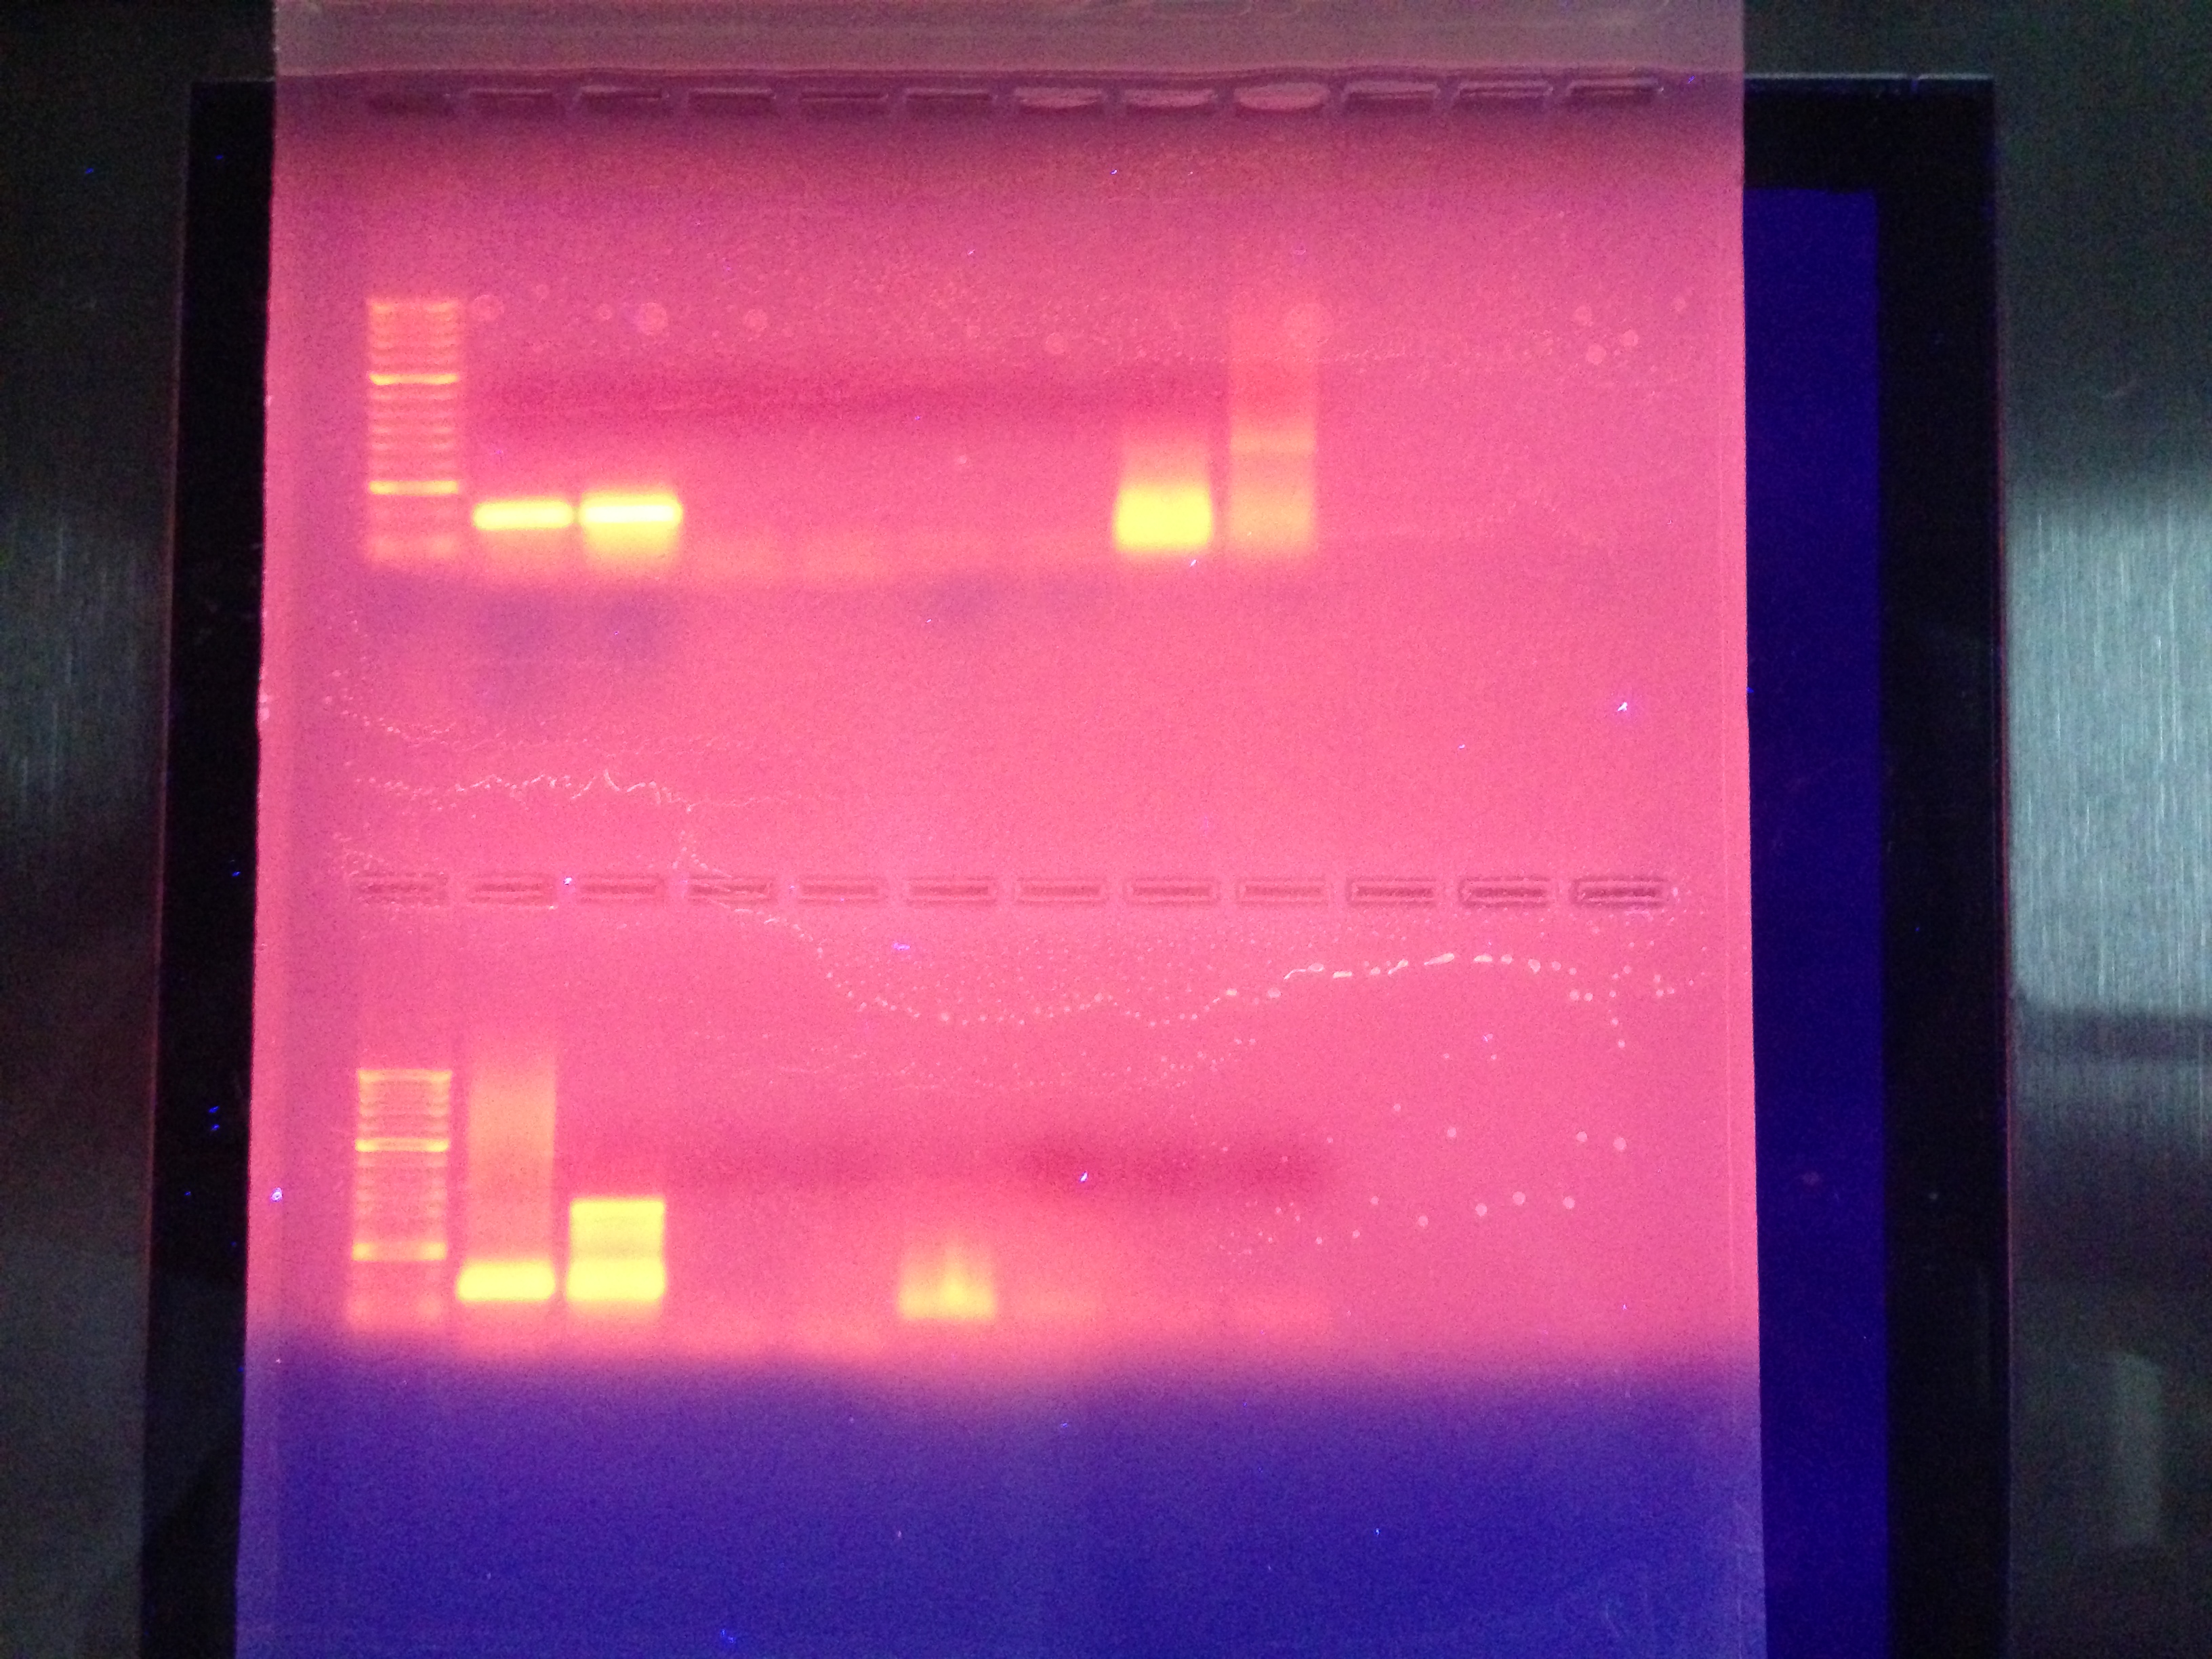
Conclusions:
This shows my blanks are clean ie. no contamination.
My cDNA shows one solid line in between the 100 and 300 which is inline with our expectations as far as size of the size of the sequence based on the primers selected for IL17.
The Genomic dna shows some lines of varying sizes and this could be that the primers have found sites similar enough to the primer used that it was able to create some different sequences. this could be remedied by running the pcr at a higher temperature to reduce attachement to similar primer sites that are not not exactly the same but similar enough.
Still waiting on qPCR results.
Reflections:
This lab showed some very useful techniques. The PCR gel can tell you if your primers worked in a very inexpensive way.
cPCR shows you if your sequence is the correct size for your primers as well.
This could be used for Gene expression experiments.
Lab 6 Oct 30 2012
Lab Objectives:
Perform qPCR to quantify gene expression of IL17 in the gill tissue used to extract gDNA and RNA to create cDNA through rtPCR
Also quantify the protein in some gill tissue from the cyclodextrin treated oysters using a spectrophotometer
Methods:
1. Prepare master mix: Prepare enough master mix for your number of reactions +1 to ensure sufficient volume recovery.
For a 25μl reaction volume:
| Component |
Volume |
Final Conc. |
Master Mix Volume |
| Master Mix, 2X (Immomix) |
12.5µL |
1x |
75 µL |
| Syto-13 dye (50uM) |
1µL |
2µM |
6 µL |
| upstream primer, 10μM |
1.25μl |
2.5μM |
7.5 µL |
| downstream primer, 10μM |
1.25μl |
2.5μM |
7.5 µL |
| Ultra Pure Water |
7uL |
NA |
42 µL |
2. Add mastermix to wells of a white PCR plate
3. Thaw cDNA samples.
4. Add 2uL cDNA template to each reaction.
5. Add 2uL of ultra pure water to the negative control wells.
6. Cap the wells securely.
7. If necessary, spin the strips to collect volume in the bottom of the wells.
8. Ensure the lids are clean and place strips on ice. (I like to wipe the lids with a clean kimwipe)
9. Load the plate, verify the PCR conditions and start the run (this will be done by your TA).
PCR conditions:
1. 95°C for 10 minutes
2. 95°C for 15s
3. 55 °C for 15 s
4. 72°C for 30 s (+ plate read)
5. Return to step 2 39 more times
6. 95°C for 10s
7. Melt curve from 65°C to 95°C, at 0.5°C for 5s (+plate read)
Samples run by TA after lab waiting on results for qPCR
Protein Quantification
Methods:
PROTEIN EXTRACTION PROTOCOL
- Record the weight of your tissue that has been denoted on the tube
- .023g for 16
- .021g for 17
- Label the snap cap tube containing your tissue sample with your initials and the date using a lab marker.
- Add 500 ul of CellLytic MT solution to the 1.5mL snap cap tube containing your cut piece of frozen tissue.
- Homogenize the tissue with a sterile disposable pestle.
- Close the tube and invert the tube several times.
- Please find a few other people at or near this same stage and form a group for this step. Spin the tube in a refrigerated microfuge for 10 mins at max speed.
- While spinning, label a fresh tube with the word "Protein", source organism/tissue, your initials, and today's date.
- Carefully transfer supernatant (the clearish liquid on top) to labeled tube and store tube on ice.
PROTEIN QUANTIFICATION PROTOCOL
- Lable a fresh 2 mL screw cap tube withe the word "Protein", BA (for Bradford Assay), your initials, and today's date.
- Dilute an aliquot of your protein sample 1:2 by pipetting 15uL of your protein sample into the 2 mL screw cap tube and the pipetting 15uL of DI water. Mix well by pipetting. Note: this dilution step is performed to ensure the sample absorbance falls within the range of the standard curve
- In a second 2 mL tube pipette 30uL of DI water (this tube will serve as your blank). Label tube as 'blank' Used a celllytic blank instead of a water blank. Only one used for the whole class.
- To both tubes add 1.5mL of Bradford reagent. Tip: Pippet 1000ul of reagent into each tube and then pipet another 500 ul of reagent into each tube for a total of 1500u ul or 1.5 mL.
- Invert the tubes several times and then incubate at room temperatire (RT) for 10mins.
- Mix the 'blank' via pippeting and transfer to a 1000ul to a plastic, disposable cuvette.
- Zero the spectrophotometer using your blank sample. Be sure to wipe the cuvette with a KimWipe first as any fingerprints or smudges can alter the reading.
- Mix the 'sample' via pippeting and transfer 1000 ul to a plastic, disposable cuvette
- Measure the absorbance at 595nm and record the value. Be sure to wipe the cuvette with a KimWipe first as any fingerprints or smudges can alter the reading.
- Remove the cuvette from the spectrophotometer. Using a P1000 set to 1000 ul, carefully pipette the solution in the cuvette up and down a couple of times to mix.
- Measure the absorbance at 595nm and record the value a second time.
- Average the two absorbance values you recorded.
- Back-calculate your protein concentration using the standard curve below. Hint: Use the equation on the graph provided. The relationship between absorbance and concentration is linear and defined by the equation y=mx+b. You have the average absorbance of your sample, x, and you want to calculate the concentration, y. Don't forget to account for the dilution in step 2!
- Give your protein sample to the TA for storage at -20ºC
Standard Curve y=996.52 x - 43.64
16 =.777 and .769 avg .773 726.66 µg/mL x 2 for dilution = 1453.32 µg/mL
17 = .509 and .509 avg .509 463.58 µg/mL x 2 for dilution = 927.16 µg/mL
Conclusions:
This shows there are proteins within the tissue and this seems to be a reasonable amount.
Next we could look for the presence of specific proteins.
Reflection:
This was a very busy lab where we setup samples for conventional PCR, qPCR and protein quantification.
These three techniques are very useful for many things not limited to gene expression quantification. PCR is also useful in checking for the presence of pathogens or any biologicals in an organism and gene expression to name a few. I would like more information on the application of protein quantification.
Lab 5 Cont. Oct 30 2012
Lab Objectives:
Use conventional PCR to determine if gene IL 17 is present in the gill tissue sample. Testing cDNA and Genomic DNA.
Methods:
Conventional PCR
First we prepared 25 μl PCR reactions
I prepared a mastermix for 4 reactions (2 blanks 1 cDNA and 1 Genomic DNA) and one extra to account for pippetting error
Reagent
2x apex red 12.5 μl per sample for a total of 62.5 μl
10 μM Primer Fw 1 μl per sample for a total of 5 μl
10 μM Primer RV 1 μl per sample for a total of 5 μl
PCR H2O 8.5 μl per sample for a total of 42.5 μl
Volume per sample 23 μl
and 2 μl of template per sample or 2 μl of H2O for blanks
23 μl of master mix and 2μl of template or H2O were pipetted into .5 mL PCR tubes and labeled with B-Blank C-CDNA or G-Genomic DNA and DI my initials
The samples were then Spun by Mac after class and run through the thermocycler with this run protocol
Denaturation 95C 5 Min 1 Cycle
Denaturation 95C 30 Sec 40 Cycles
Annealing 55 C 30 Sec 40 Cycles
Extention 72 C 90 Sec 40 Cycles
Final Extention 72 C 3 Min 1 Cycle
Hold 4C
and then place in -20C freezer
Still waiting on results
Lab day 5 October 23 2012
Lab Objectives:
Take measurements of the oysters and take tissue samples for gene expression analysis. My samples were the cyclodextrin and were sampled 24 Hours after start of exposure. We also had controls and two heat shock treatments. One shock was at 35 C for one hour and the other was at 40C for one hour. My group processed only Pacific oysters.
Materials:
Calipers
Shucker
Trays
Ice (Dry/Wet)
Scissors
Forceps
3 2 mL tubes per specimen
Bleach
DI water
Ethanol
Methods:
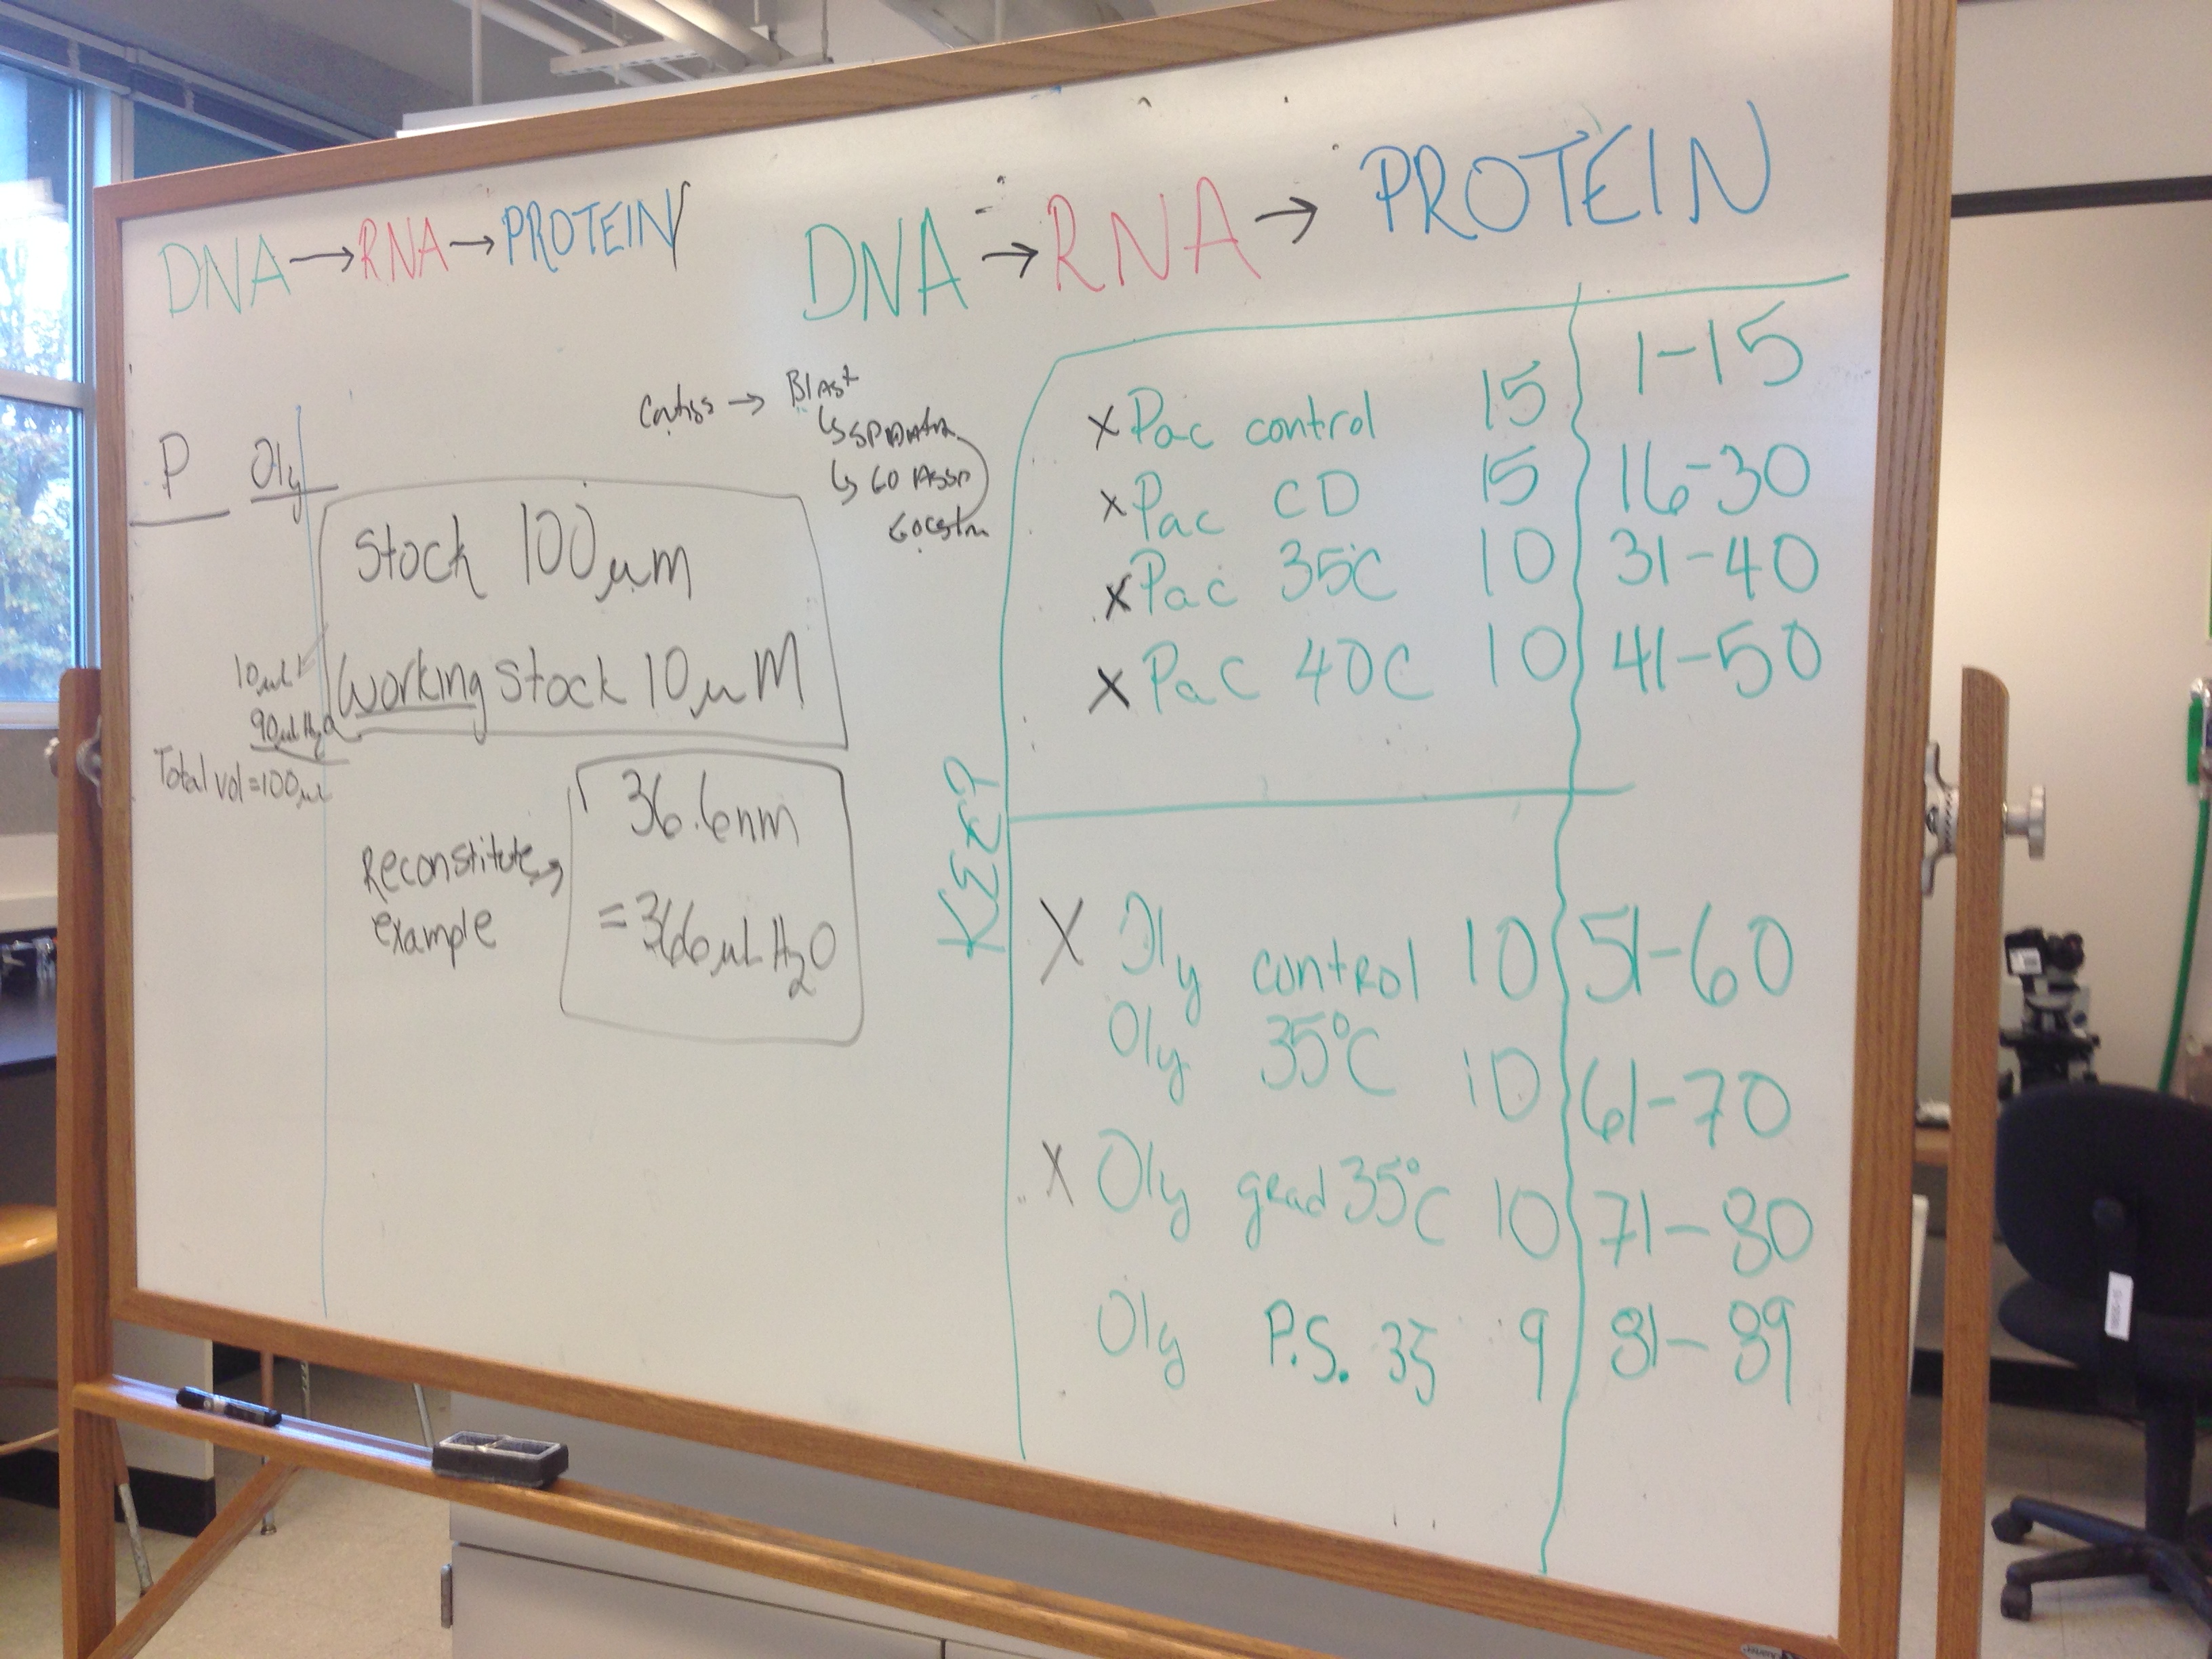
1. Labeled tubes 3 per animal. 2 gill and 1 mantle tissue sample. The numbering scheme is on the right side of the whiteboard pictured below.
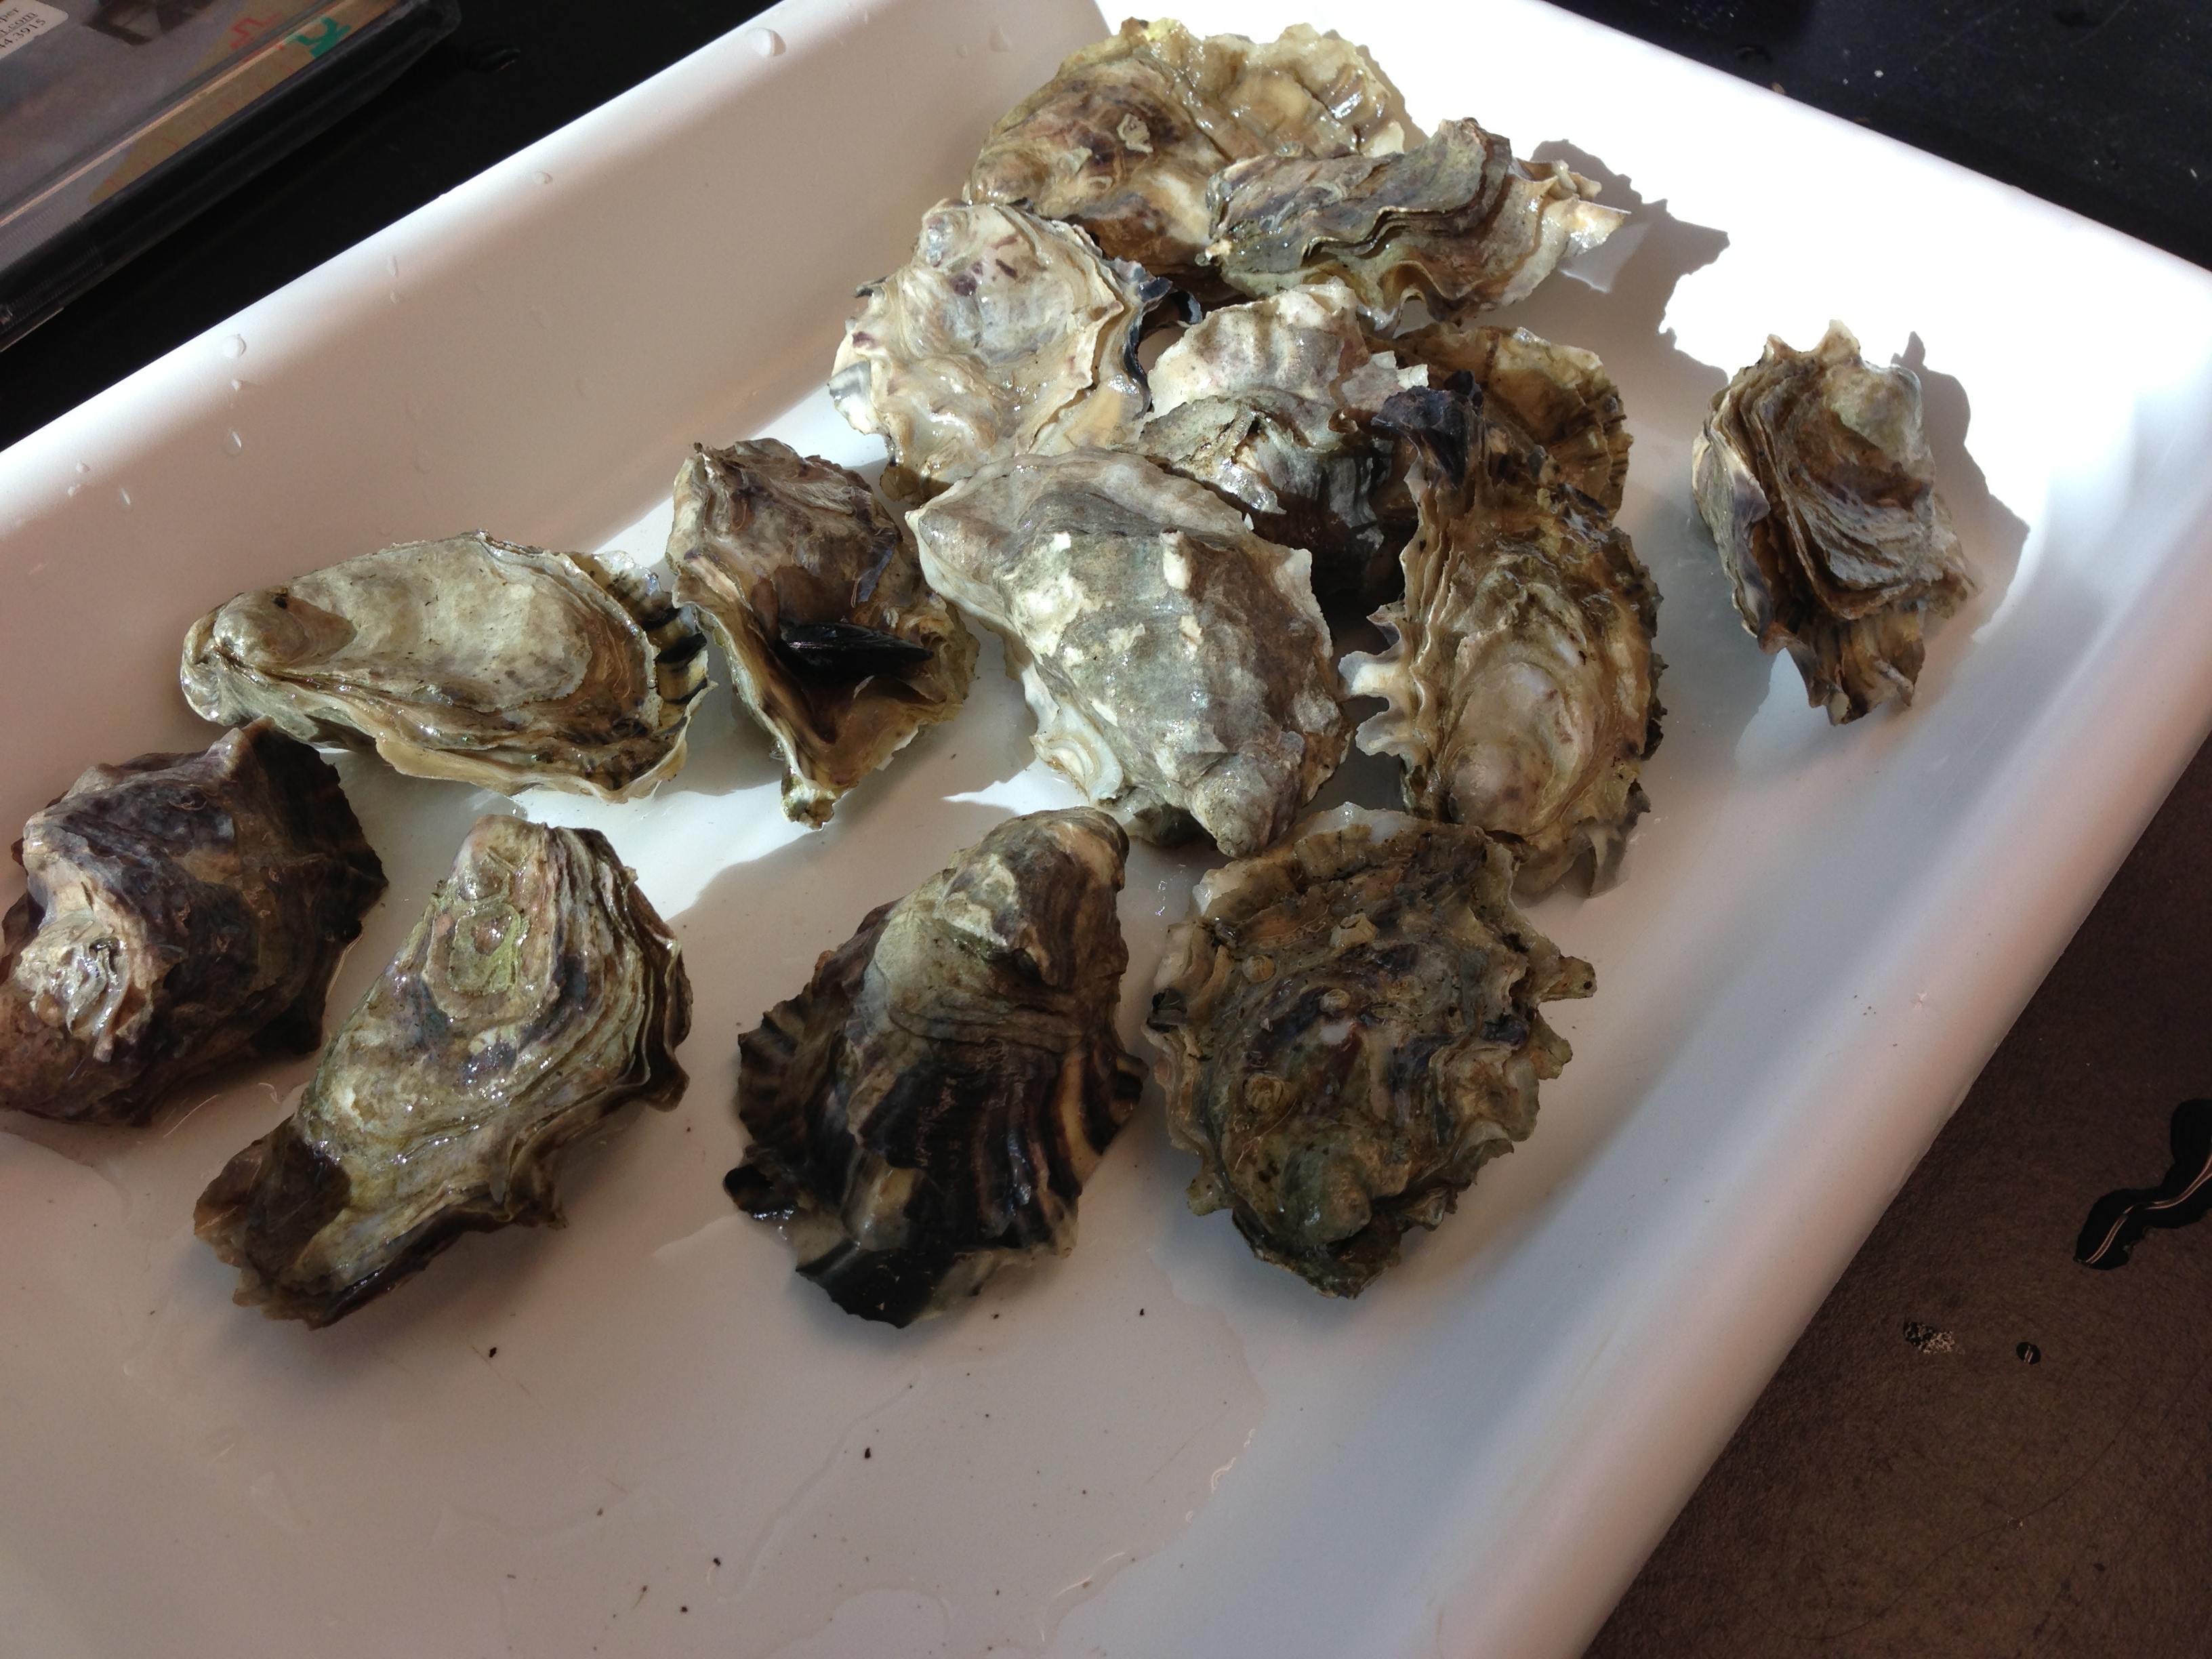
2. Removed Oysters from water and placed on ice in a tray.
3. Measured the Oysters Length and Width
https://docs.google.com/spreadsheet/ccc?key=0AmtUfwrxf-JSdEpPUWF0RFY4ejJEX2FZWnFadGxGV1E
4. Shucked the oysters
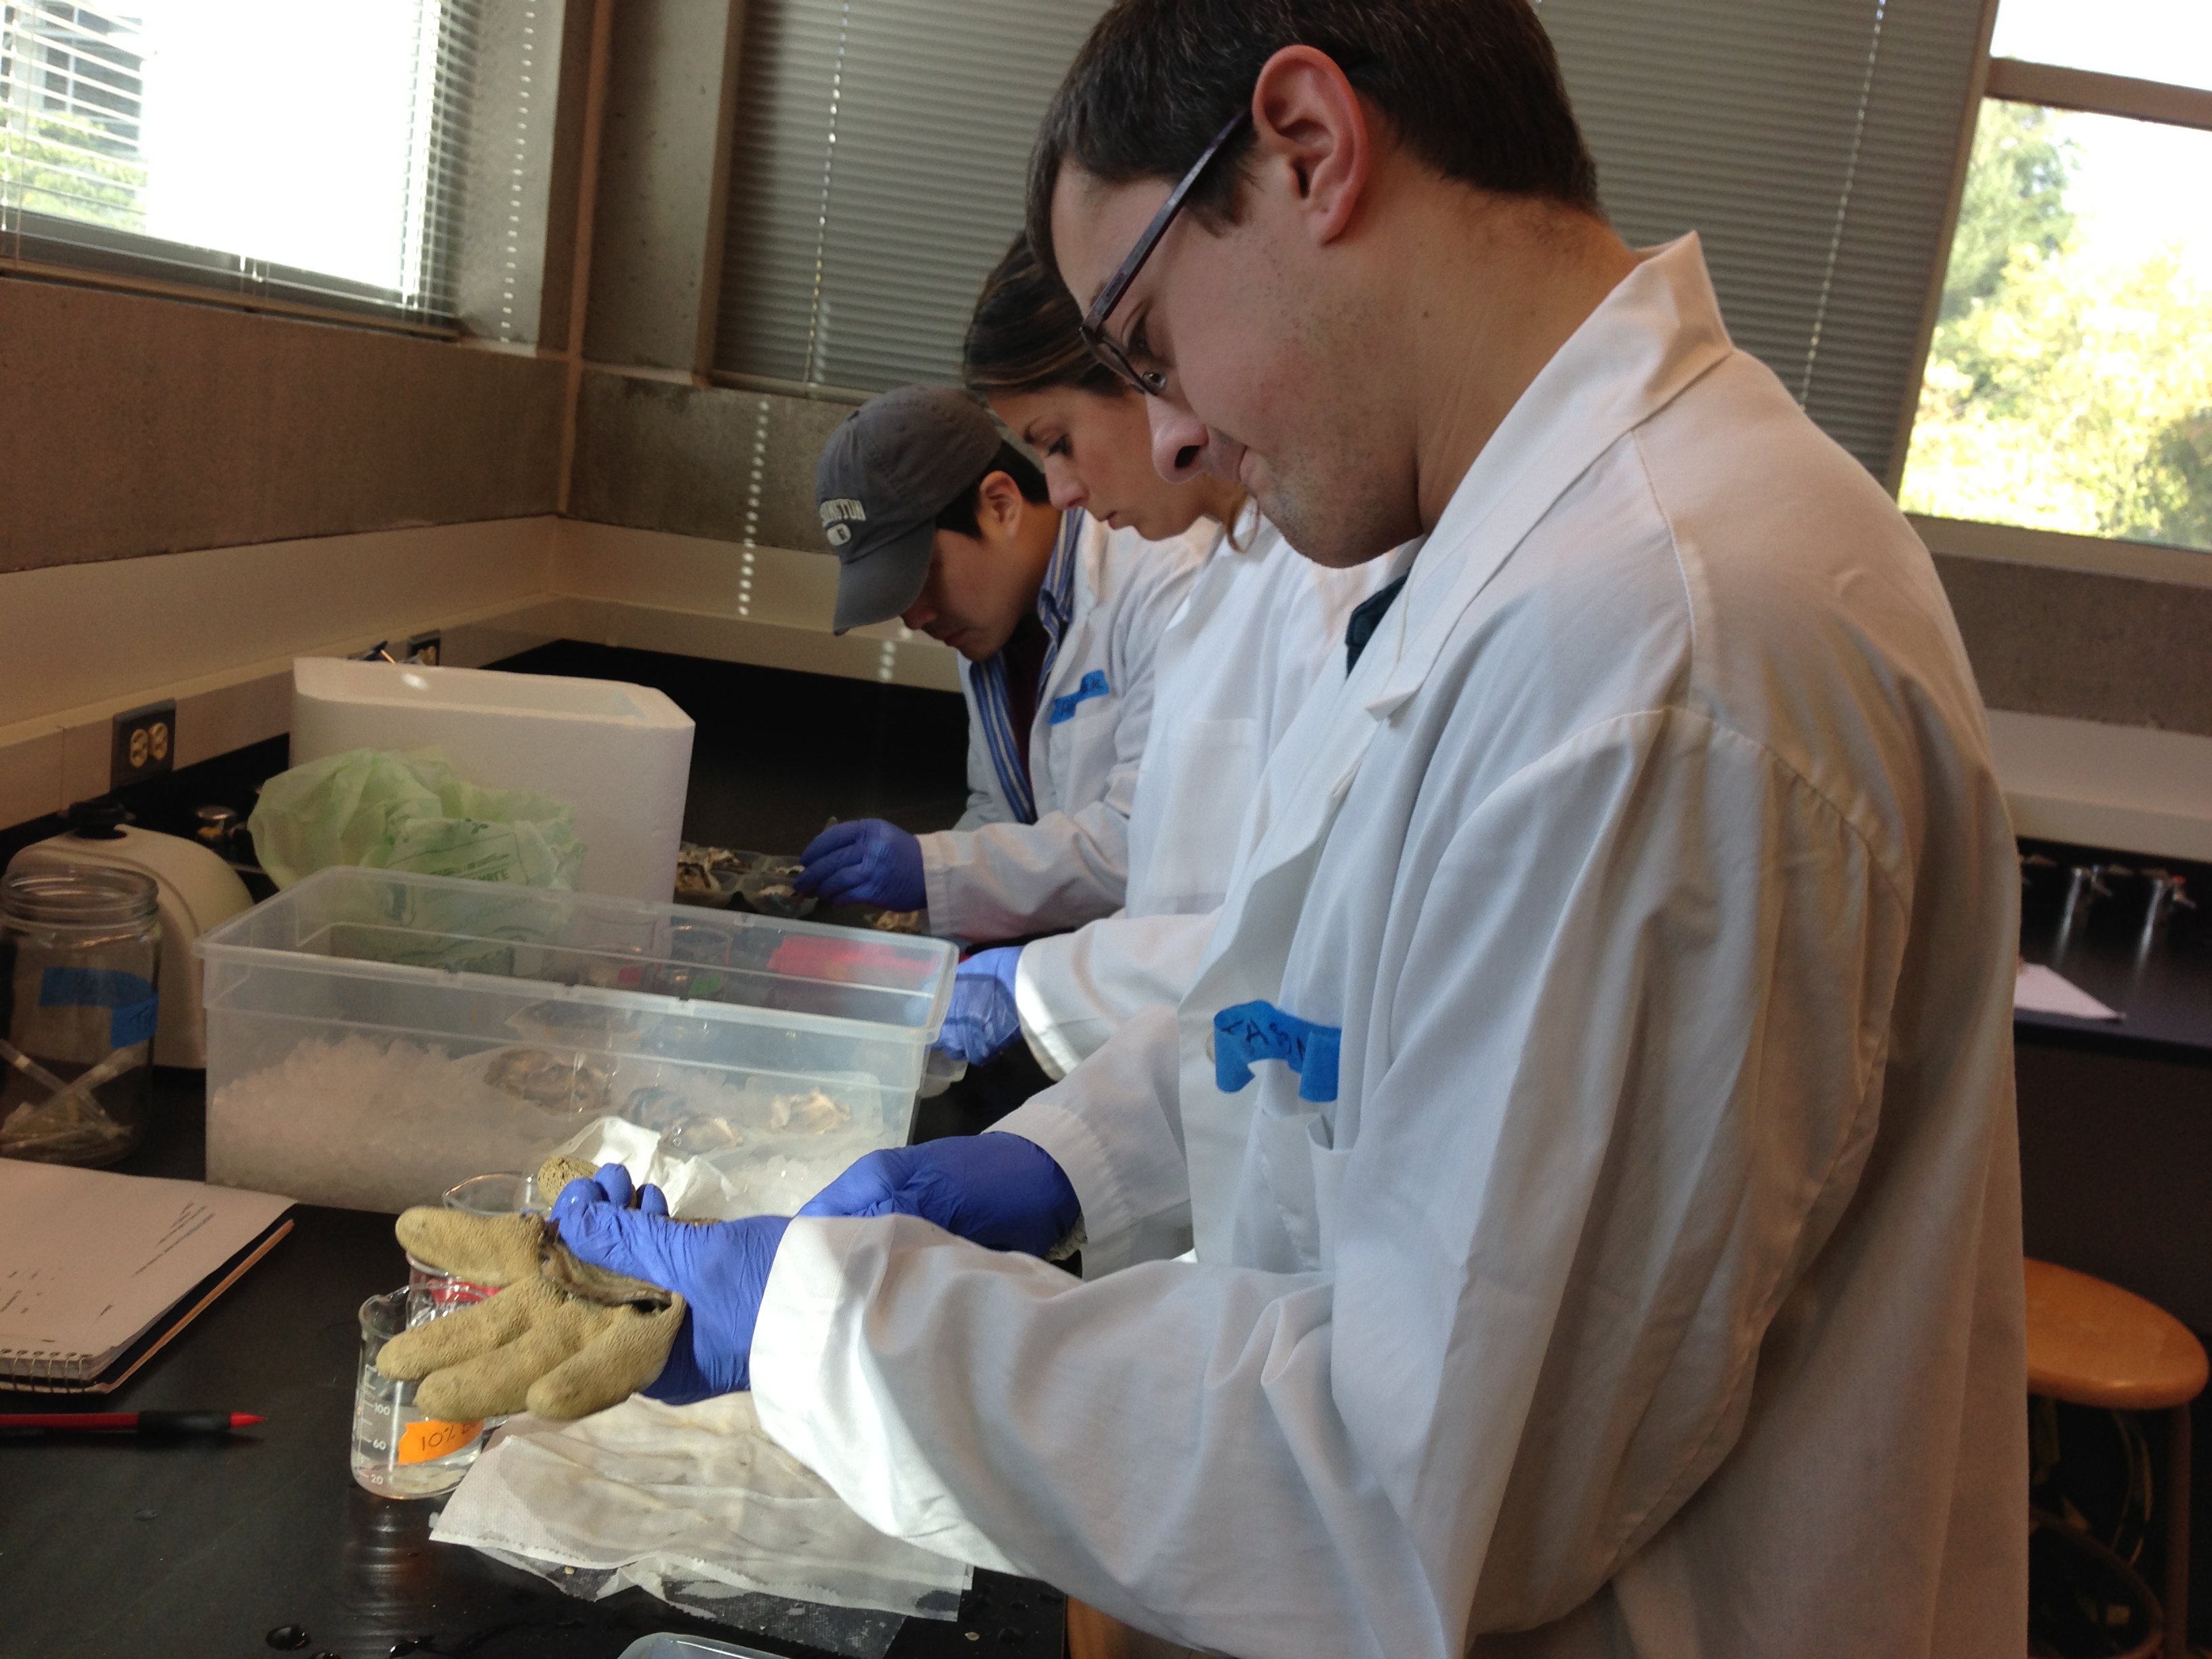
5. Eraser size section was taken of the gill twice and the mantle once and placed the tubes on dry ice. In between each sample the tools (Scissors, forceps and shucker) were dipped in bleach, ethanol, and then rinsed in DI water.
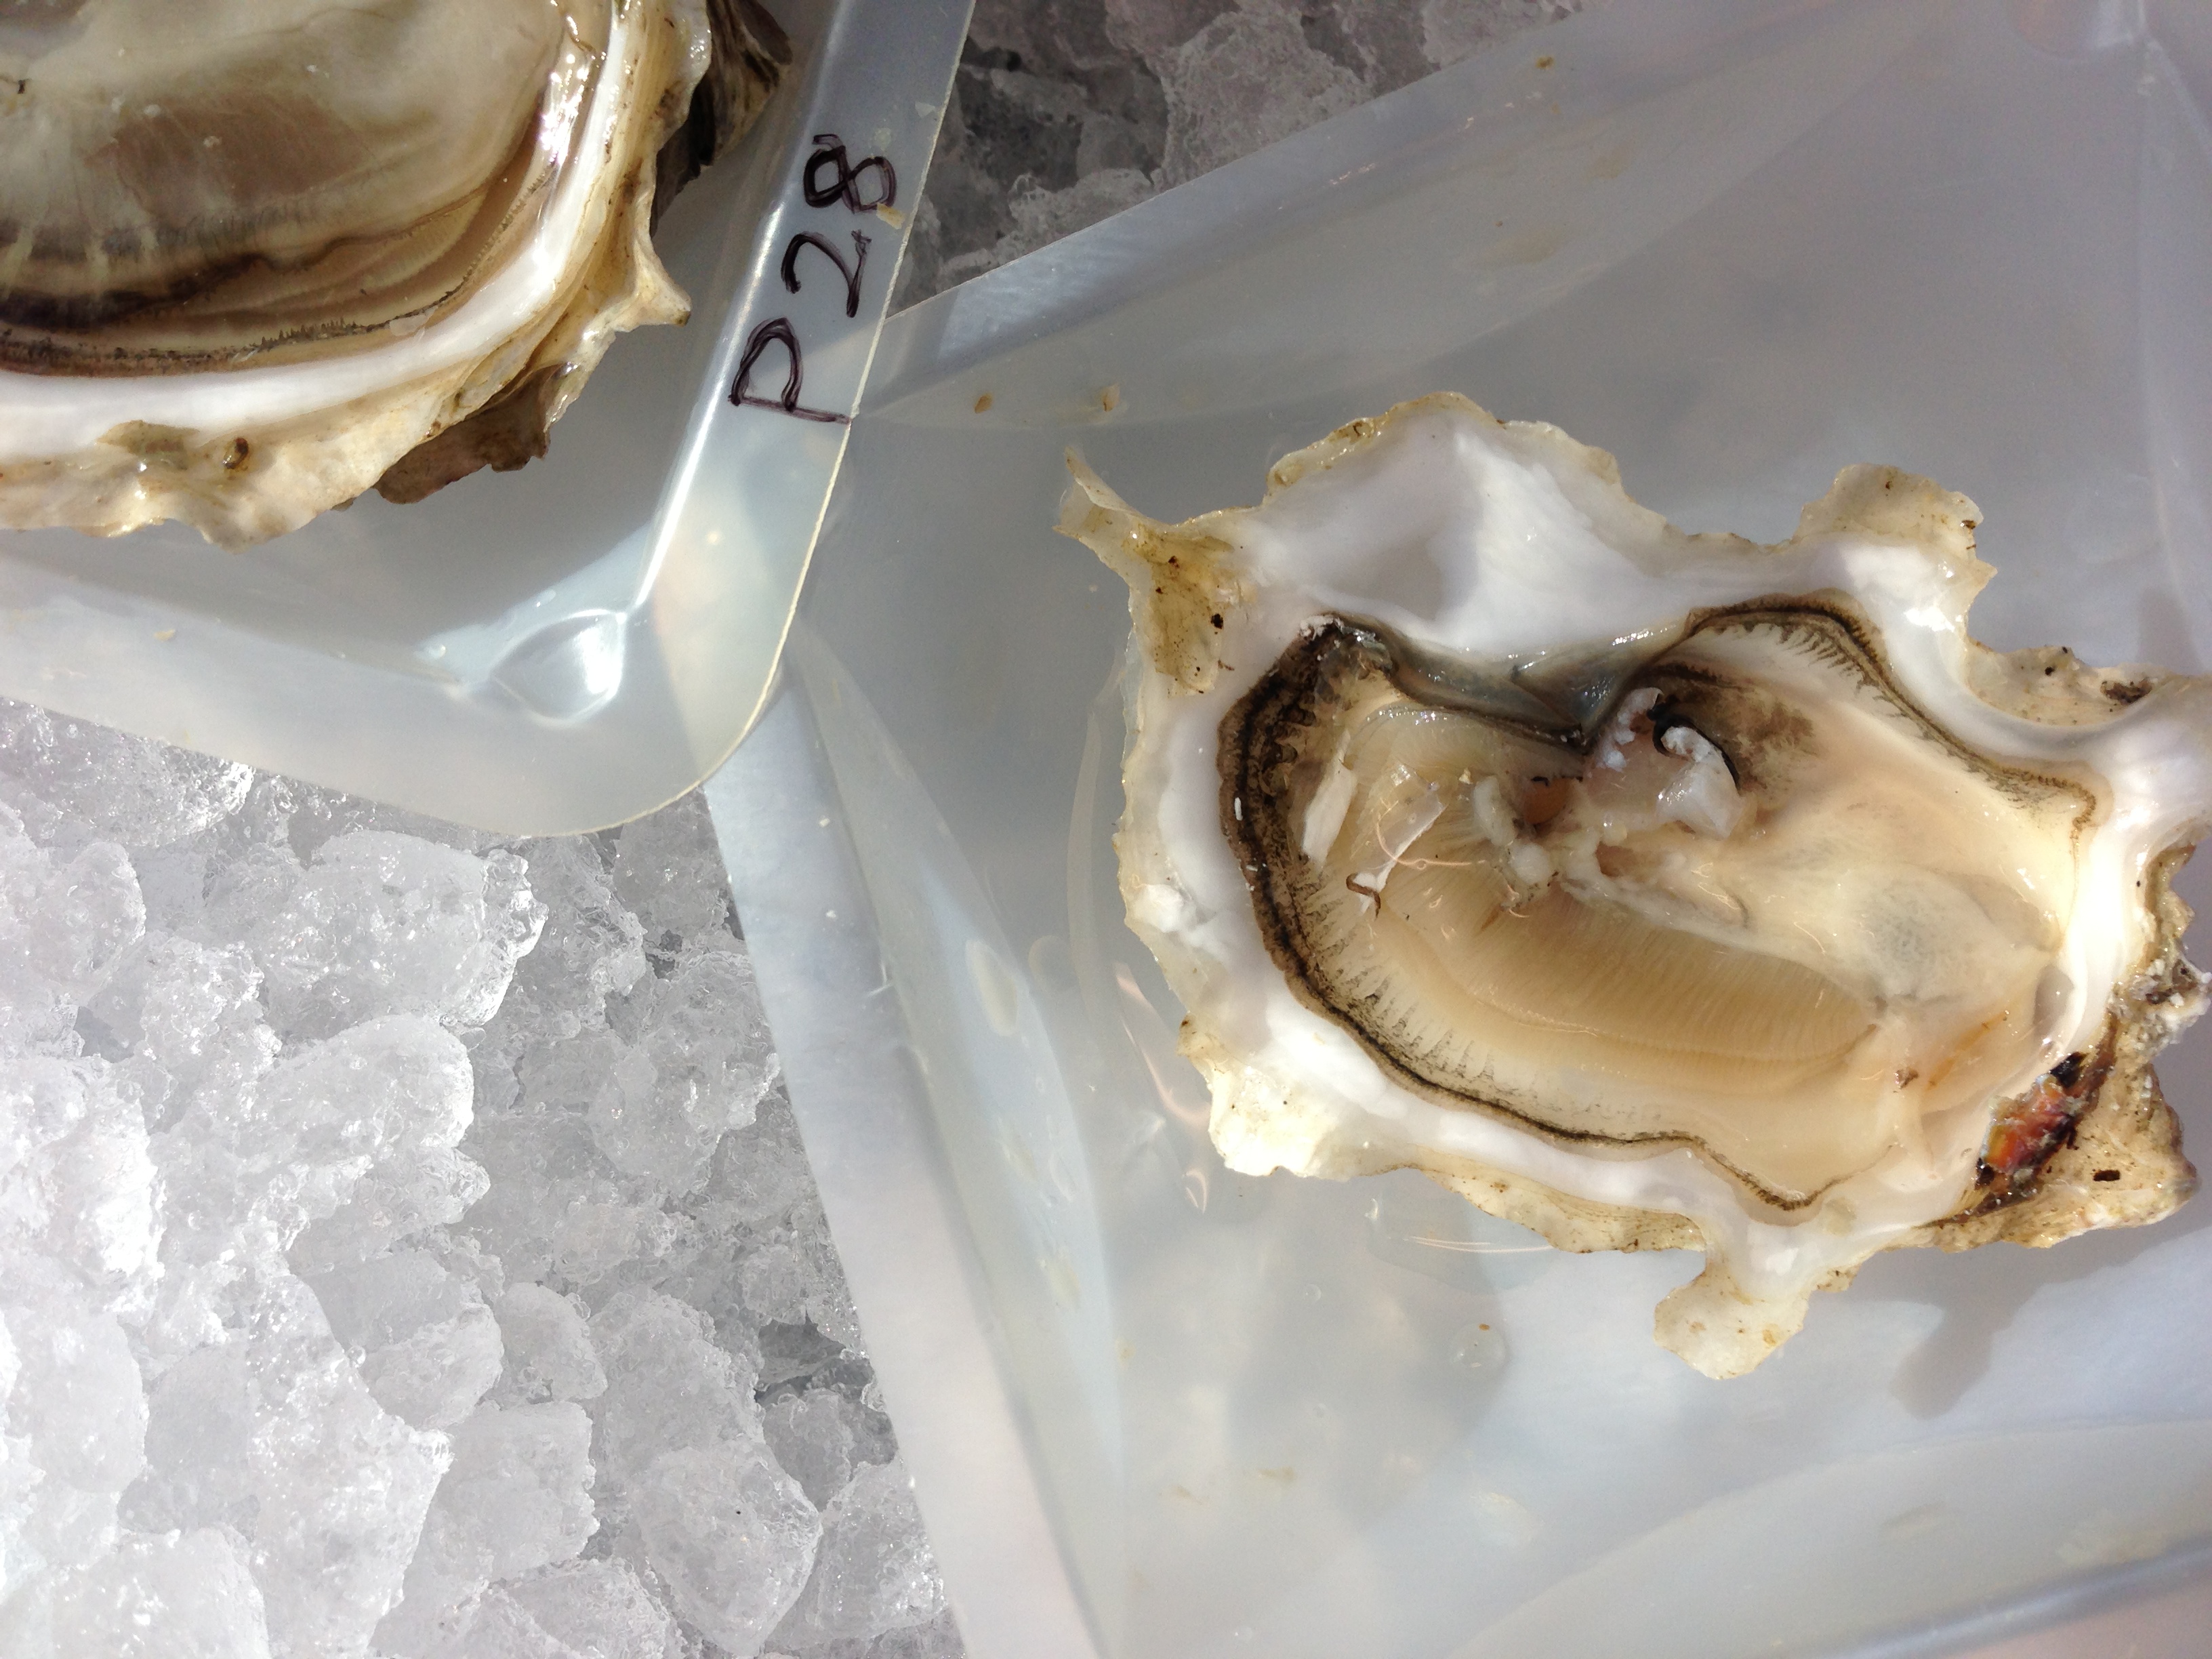
6. These samples were then taken to be held in the Minus 80 Freezer
Second part of the lab was reconstituting my primers.
Materials:
Primers
Water
2 mL tube
Methods:
Looked at the primer vials and calculated amount of water to create the 100 uM solution
89182909
DI_Gigas_Il17 FWD
add 366 uL of water
89182910
DI_Gigas_IL17 RVS
add 262 uL of water
dilute to 10 uM working solution by adding 90 ul of pcr water and 10 ul of primers to tube and freeze in -20 C
Results:
No results yet
Conclusions:
I think all the samples were taken well and we were able to get it all done in a timely manner. Next step will be DNA/RNA extraction.
Reflection:
This was a fun lab where we were able to sample our experiments that we designed. These methods can be used for any sampling of an Oyster under numerous experimental designs.
Lab day 5A October 22 2012
Objective:
Set up experiment for the cyclodextrin treatment
Today Jason and I started the cyclodextrin exposure. We filled a plastic rectangle tub with 7 L of 14 Degree Celsius seawater and added a powerhead for circulation and an air stone for some oxygenation and gas equilibration. With 1 L of seawater we brought this to the molecular lab and measured out 2 g of cyclodextrin and stirred until completely dissolved into solution.
In Rick's data on zebrafish the necessary dose was 250 micrograms per mL so we used this as our dosage for the oyster treatment.
250 micrograms per ml or .25 g per L
8 L x .25g = 2 g
The cyclodextrin treated L of water was added to the 7 L in the tub and 15 Pacific oysters were placed in the tub with a density similar to that of the control group.
A lid was set on the tub to minimize splashing from the air stone into the control tank.
Lab day 4 October 16 2012
Lab Objectives
- Reverse transcribe RNA to cDNA
- Learn about dissecting animal tissue from your experiments using sterile technique
- Mock-up Experiment to prepare for the initiation of experiments
- Design and order primers
SUMMARY:
Today we reverse transcribed RNA to cDNA in order to maintain a more stable version of the genes expressed.
We also discussed projects and set up our tanks and discussed genes of interest and designed primers to be ordered.
REVERSE TRANSCRIPTION PROTOCOL
- Mix your stock RNA sample by inverting tube several times.
- In a 0.2 ml PCR tube labeled with your initials and “cDNA” combine the following:
- 5 μl of YOUR total RNA (extracted and quantified in lab)
- 1 μl of oligo dT
- 4 μl of nuclease free H2O
- Incubate the mixture for 5 min at 70°C on the thermocycler then immediately transfer to ice. Briefly centrifuge you tube and the add the following:
- 5 μl of M-MLV 5X Reaction Buffer
- 5 ul of dNTPs
- 1 μl of M-MLV RT
- 4 μl of nuclease free H2O
- Incubate the mixture for 60 min at 42°C and then heat inactivate at 70°C for 3 min on the thermocycler.
- Spin down the sample in a desk top centrifuge.
- Store on ice or at -20°C
Primer Design
Primers, or oligonucleotides (oligos), are short stretches of synthetic DNA that are used most commonly for PCR and DNA sequencing. They direct DNA polymerases to specific regions on larger DNA molecules for amplification. They are designed in pairs to amplify DNA in the forward and reverse directions. Oligos are custom synthesized by various manufacturer's to contain the precise sequence requested by the customer. For a good introduction to the theory of primer design procede to this link.Photo source: http://bioweb.uwlax.edu/genweb/molecular/seq_anal/primer_design/primer_design.htm
Here is a breif list of things to take into consideration when designing primers. Although none of these are absolute, they will help ensure your primers will hybridize to your target sequence with the best efficiency.
1. Design your primers to be within 18-30 bases in length.
2. The melting temperature (Tm) of primers should be within 2C of each other.
3. Avoid primer dimers and primer hairpins
4. Avoid high G/C stretches, particularly at the 3' end
5. G/C clamp at 3' end of primers.
NCBI -> search for gene of interest -> nucleotide -> pick primers on right hand side -> size 80-200 bp -> Melting temp 60 +- 3 C-> length primers Low self complementary score is good!
I picked IL17 and submitted primers for this gene to TA for ordering.
This is for Pacific Oyster. We will be using 20 specimens for the treatment. Also considering using prostoglandin E2 receptors and Cyc1a1 to see if response is xenobiotic response.
Conclusions and results:
This procedure for cDNA was completed and TA removed from thermocycler after lab was over. There were no results to analyze at this point in the process.
Reflection:
I think this was a good learning example of how to create cDNA for the analysis of gene expression.
This could be used in any experiment that wants to measure RNA for gene expresion or sequencing.
Lab Day 3 October 9 2012
RNA Extraction Part 2
We were able to use the extracted RNA from the tissue samples and quantify it on the nano drop. It just tells us about how much RNA is in the sample.
RNA EXTRACTION PROTOCOL
Continued from Lab 1
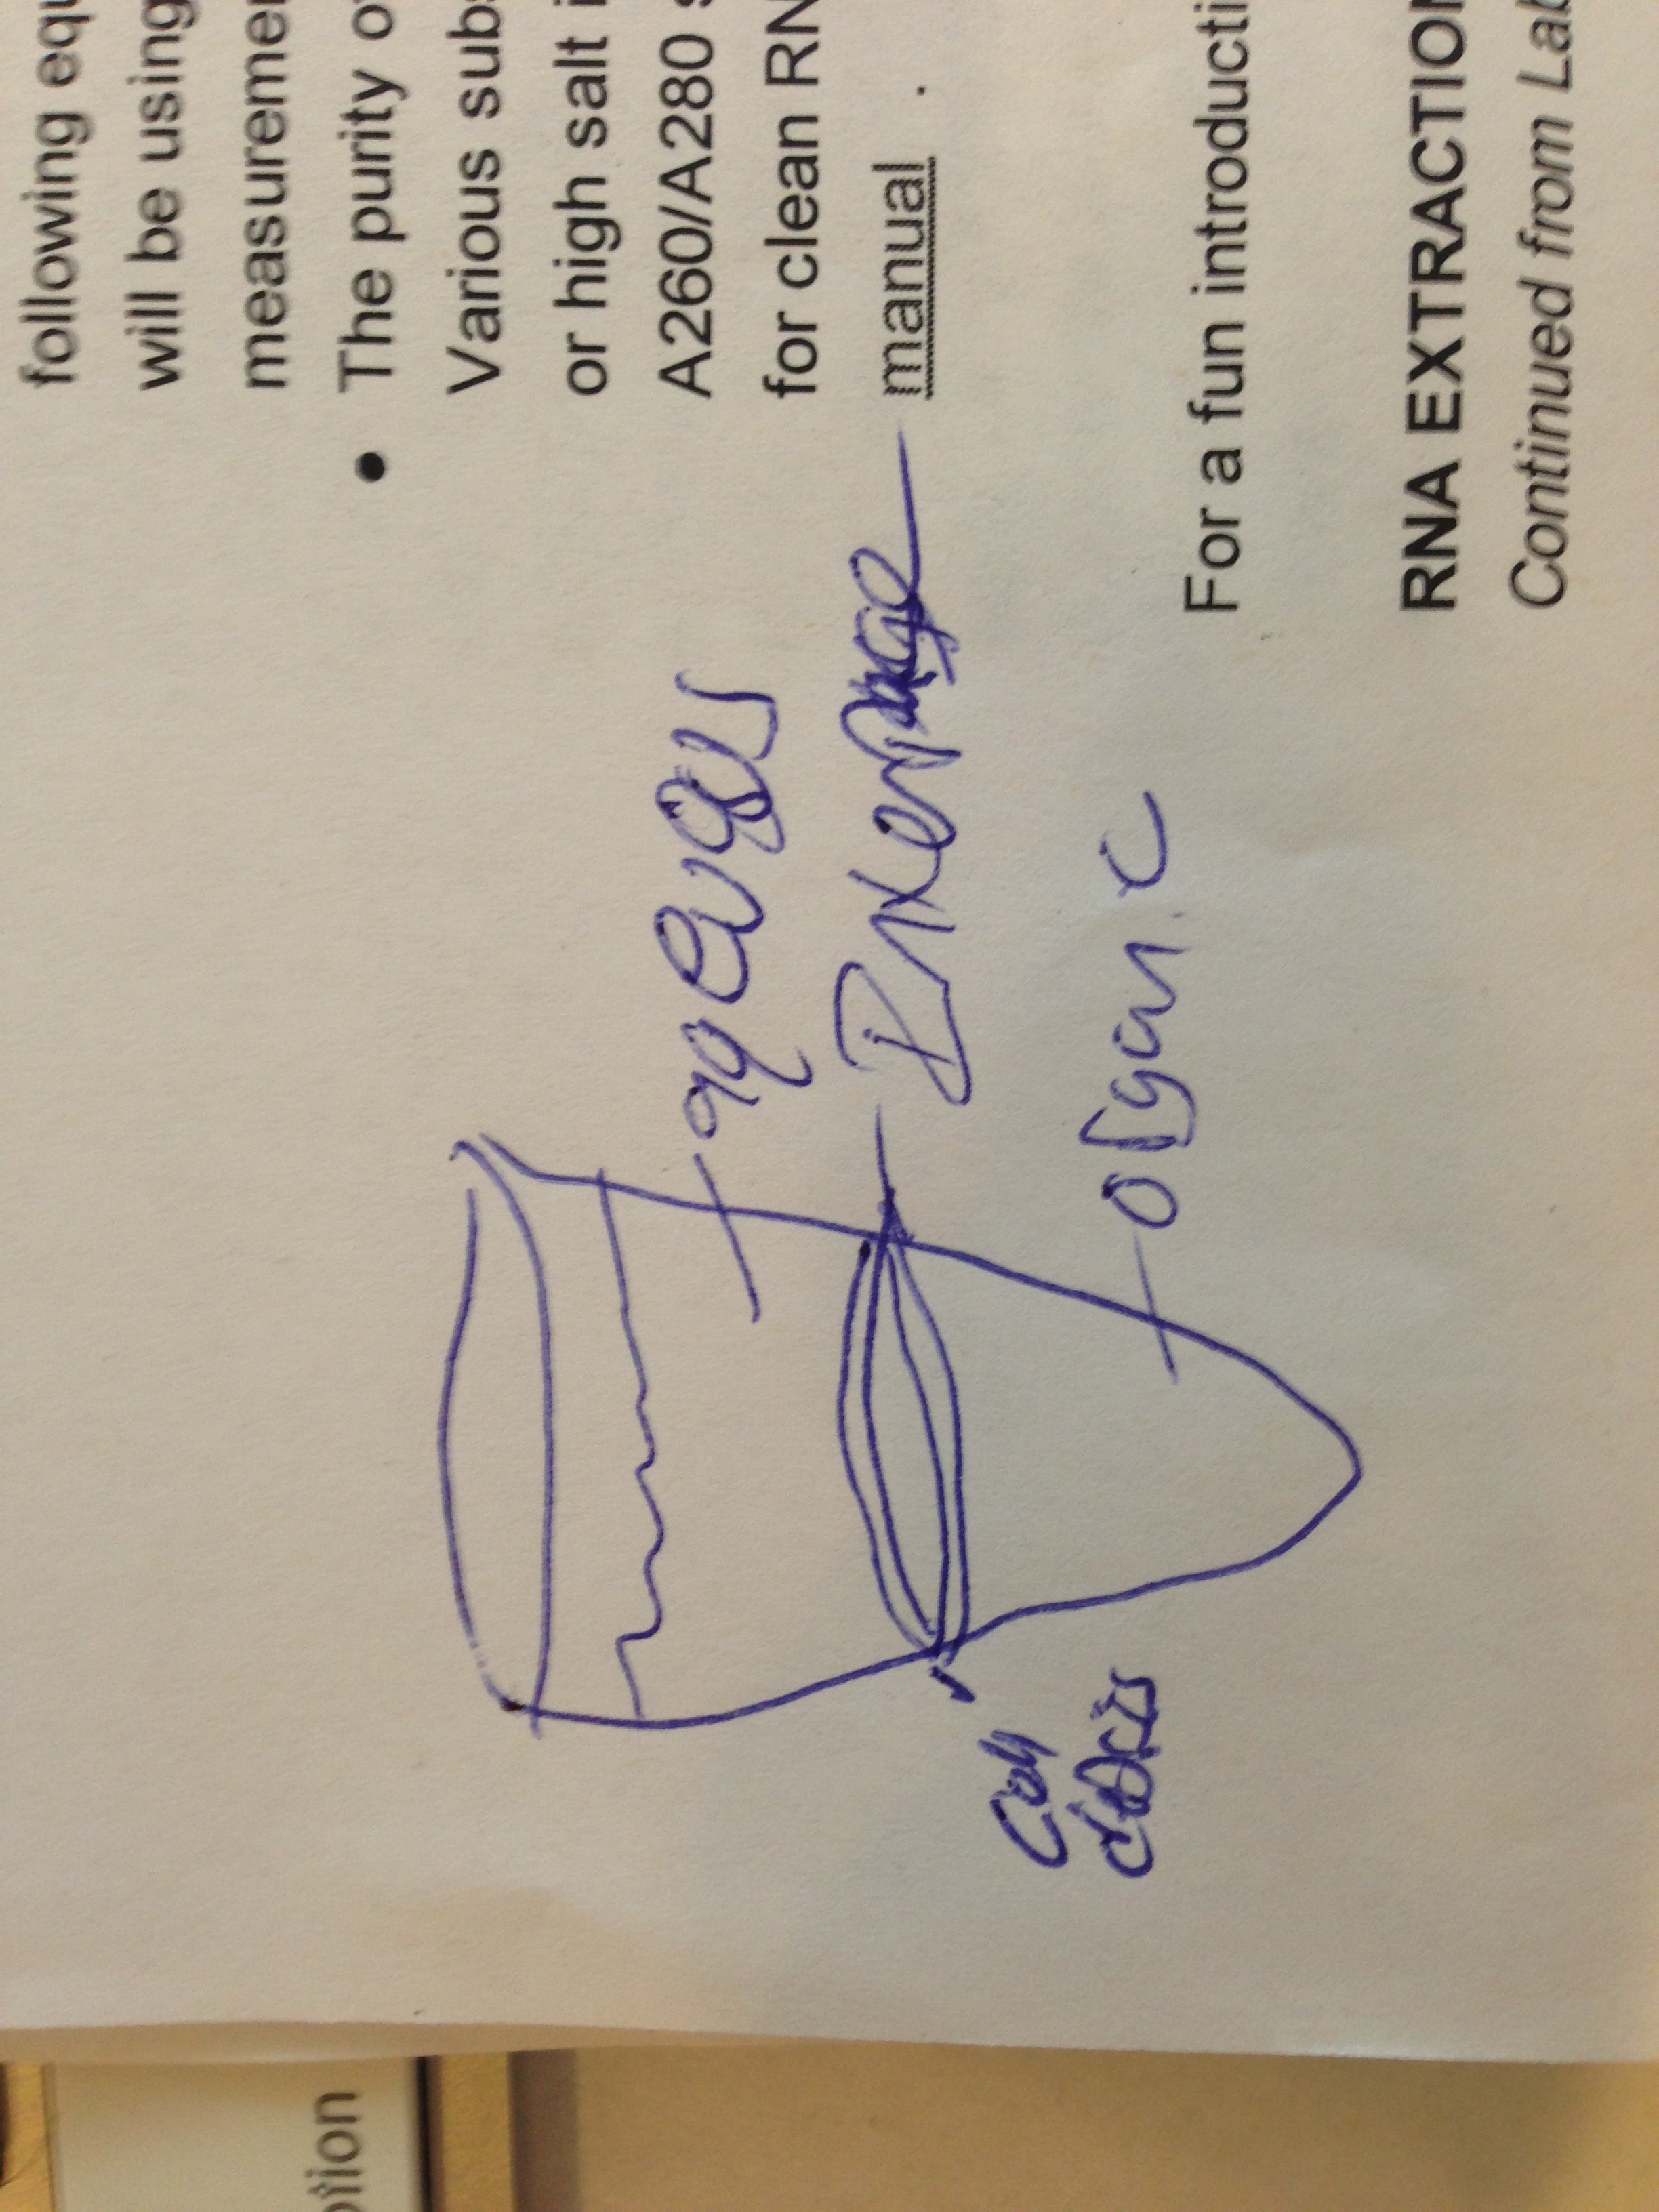 |
| Step 8 |
1. Turn on heating block to 55°C.
2. Incubate your homogenized tissue sample (from Lab 1) tube at room temperature (RT) for 5 mins.
3. In the fume hood, add 200uL of chloroform to your sample and close the tube. NOTE: Due to the high volatility of chloroform, pipetting needs to be done carefully and quickly. Have your tube open and close to the container of chloroform before drawing and chloroform into your pipette tip.
would have been good to quick mix before adding chloroform because of freezing
4. Vortex vigorously for 30s. You are vortexing correctly if the solution becomes a milky emulsion.
5. Incubate tube at RT for 5 mins.
6. Spin tube in refrigerated microfuge for 15 mins. @ max speed.
7. Gently remove tube from microfuge. Be sure not to disturb the tube.
8. Slowly and carefully transfer most of the aqueous phase (the top, clear portion) to a fresh microfuge tube. Do NOT transfer ANY of the interphase (the white, cell debris between the aqueous and organic phase).
9. Close the tube containing the organic and interphase and properly dispose of the liquid inside the tube as well as the tube itself at the end of the lab.
10. Add 500uL isopropanol to the new tube containing your RNA and close the tube.
11. Mix by inverting the tube numerous times until the solution appears uniform. Pay particular attention to the appearance of the solution along the edge of the tube. If mixed properly, it should no longer appear viscous/"lumpy".
12. Incubate at RT for 10 mins.
13. Spin in refrigerated microfuge at max speed for 8 mins. When placing your tube in the microfuge position the tube hinge pointing up, away from the center of the microfuge.
14. A small, white pellet (RNA and salts) should be present. If not, do not fret an continue with the procedure.
15. Remove supernatant.
16. Add 1mL of 75% EtOH to pellet. Close tube and vortex briefly to dislodge pellet from the side of the tube. If the pellet does not become dislodged, that is OK.
17. Spin in refrigerated microfuge at 7500g for 5mins. ran at 7600 because 7500 was not an option
18. Carefully remove supernatant. Pellet may be very loose. Make sure not to remove pellet!
19. Briefly spin tube (~15s) to pool residual EtOH.
20. Using a small pipette tip (P10 or P20 tips), remove remaining EtOH.
21. Leave tube open and allow pellet to dry at RT for no more than 5mins.
22. Resuspend pellet in 100uL of 0.1%DEPC-H2O by pipetting up and down until pellet is dissolved.
23. Incubated tube at 55C for 5mins. to help solubilize RNA.
24. Remove tube from heat, flick a few times to mix and place sample on ice. This will be your stock RNA sample.
25. Quantitate RNA yield using Nanodrop spectrophotometer.
RNA QUANTIFICATION
NOTE: Always keep your RNA samples on ice!
1. Pipette 2µL of 0.1%DEPC-H20 onto the Nanodrop pedestal and lower the arm.
2. Click "Blank", to zero the instrument. NOTE: steps 1 and 2 only need to be done once for the whole class.
3. Pipette 2µL of your RNA sample onto the Nanodrop pedestal and lower the arm
4. Click "Measure". Record your RNA concentration (ng/µL), A260/280 ratio and A260/230 ratio. NOTE: The Nanodrop uses the Beer-Lambert Law to calculate RNA concentration for you. See Lab 1 notes on RNA extraction for more information on the calculation and how to evaluate RNA purity using A260/280 and A260/A230 ratios.
6. Raise the arm and wipe off you sample with a KimWipe
7. Clearly label your stock RNA sample with the word "RNA", source organism/tissue, your initials, today's date and the concentration in ug/uL.
8. Give your samples to the TA for storage at -80C.
I named mine claire (whoops)
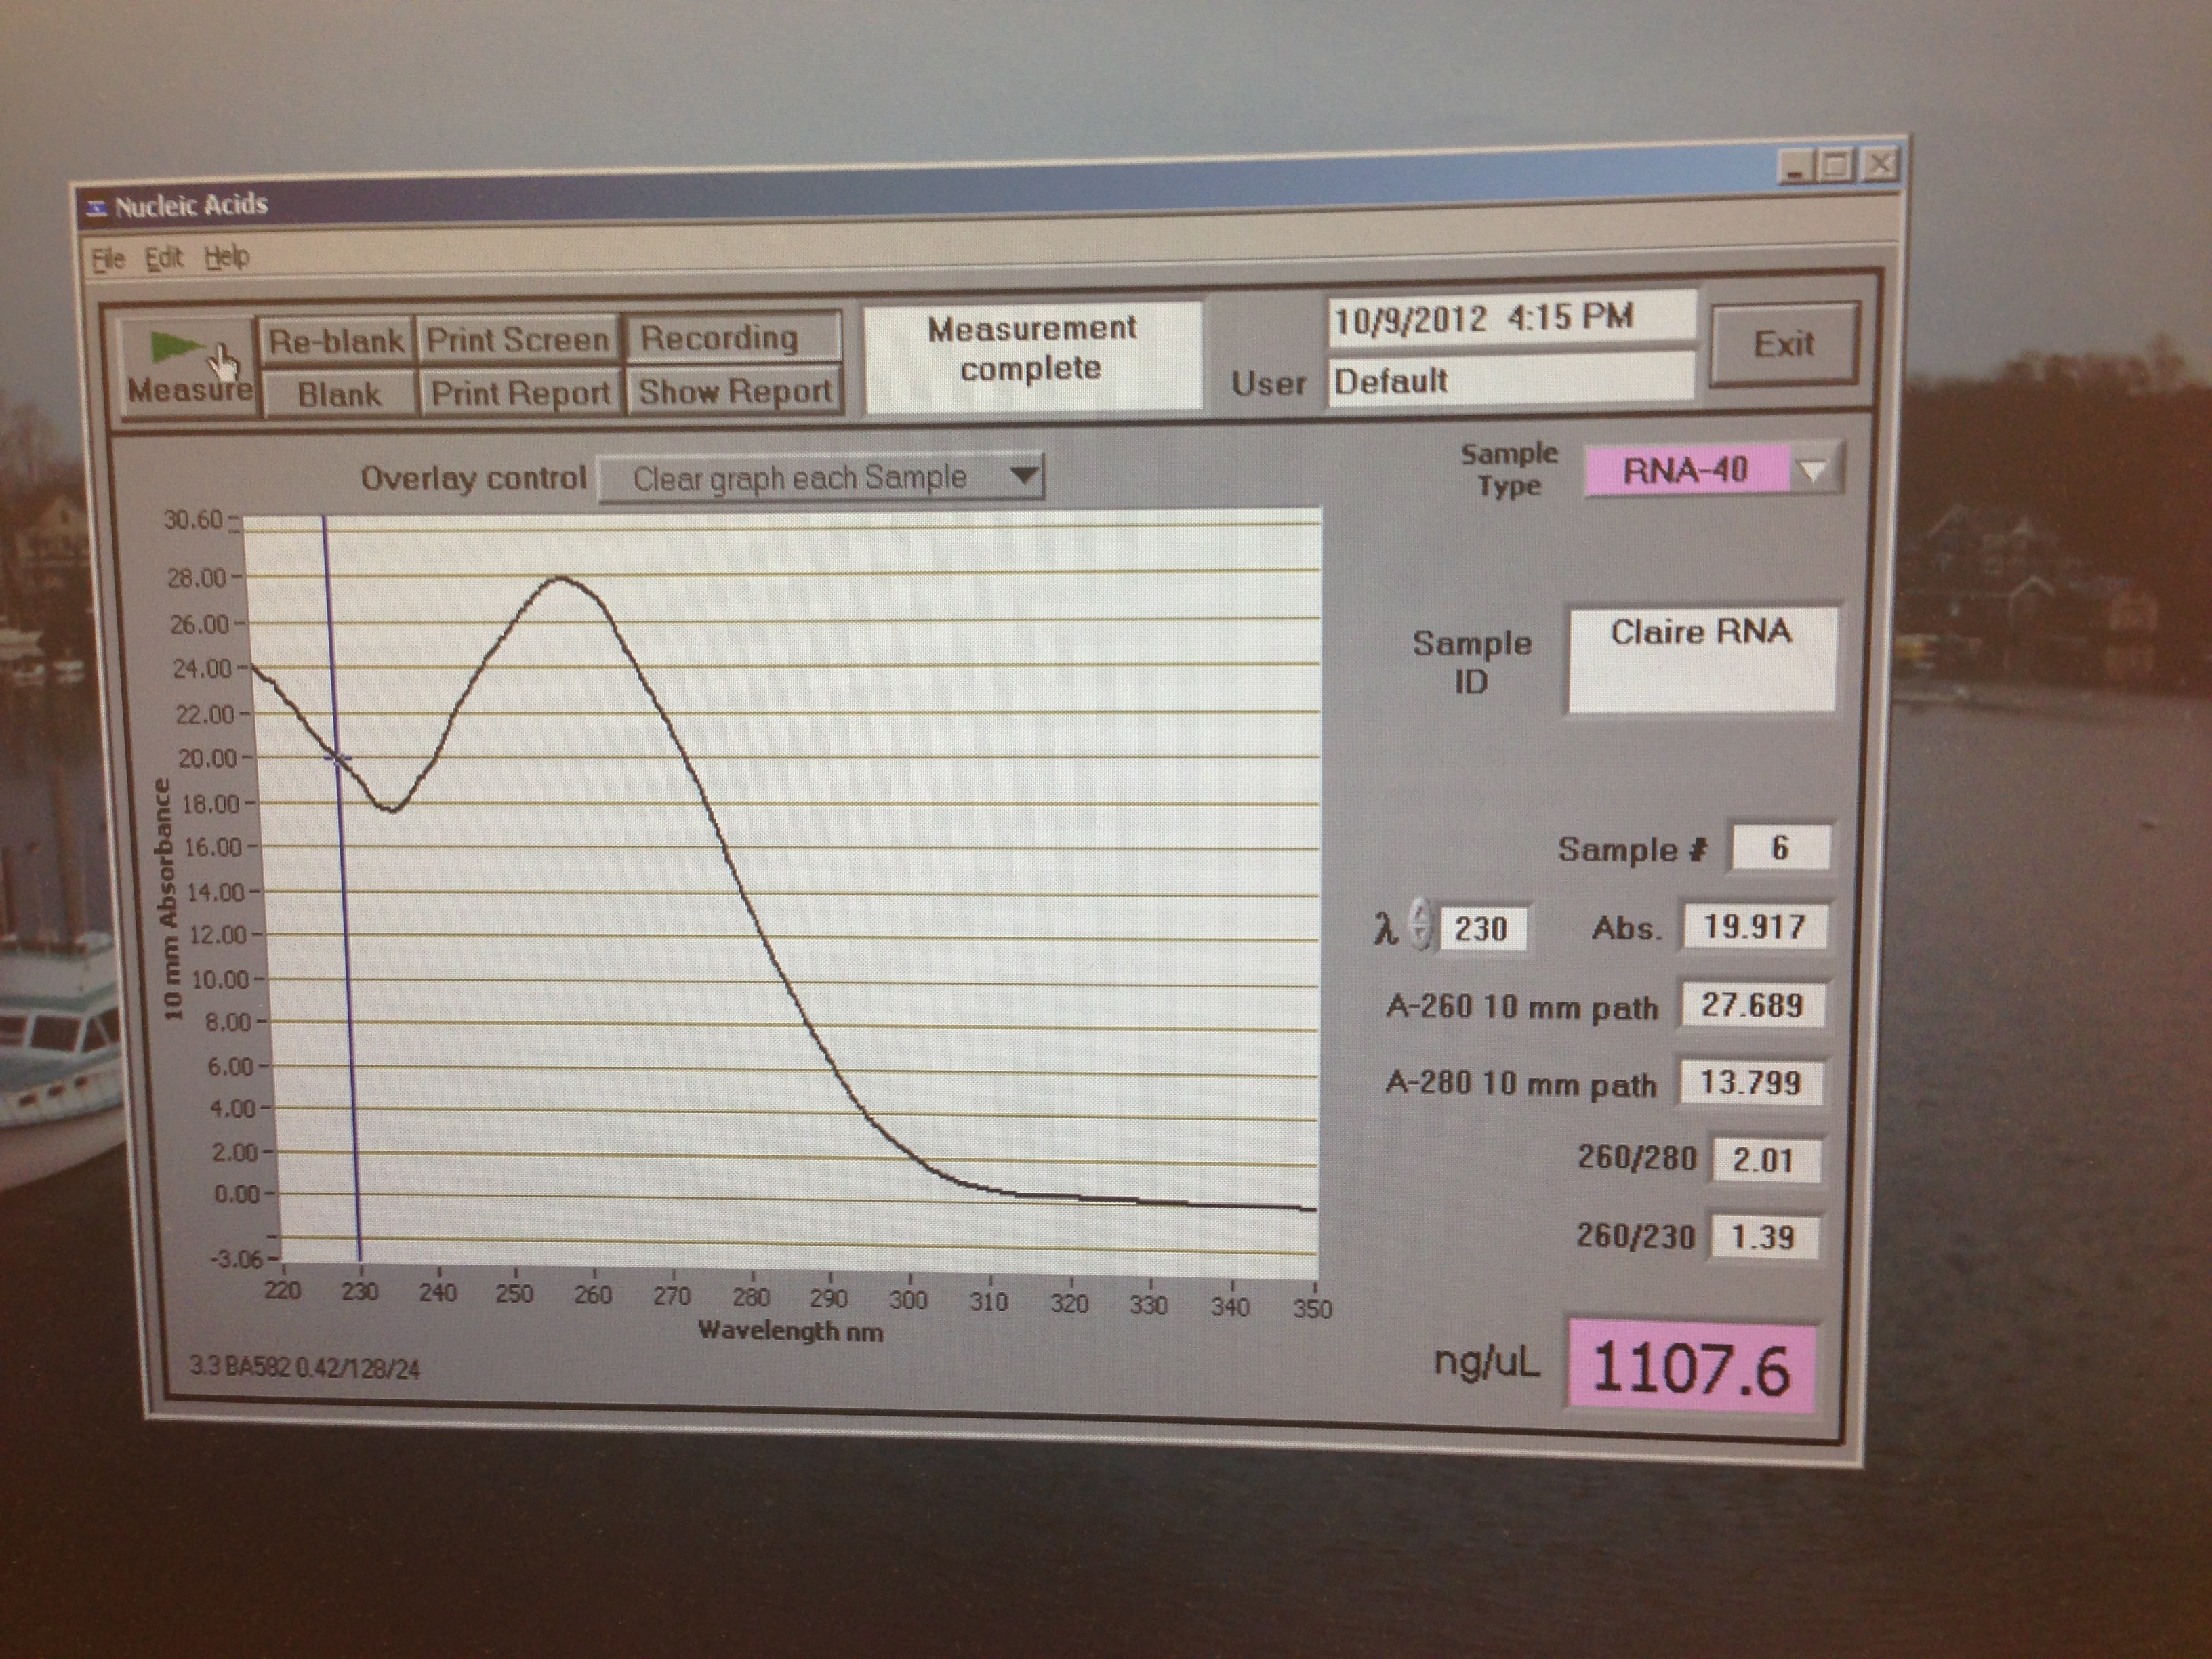
I think this shows I had a good amount of RNA but also had some high salts in my sample again which is probably a reflection of the tissue type. Low protein content though so the extraction was clean.
This lab was to learn to isolate RNA from a tissue sample and see the discrepancies between tissue types and the amounts of RNA in each.
This could be used to look at gene expression from environmental stimulus.
Why exactly would we want to know how much RNA is there. Would it not be more useful to see specifically what RNA is there?
I would like more info on the different types of extractions and why each one is used. Also what is the chemistry behind the extraction? how does each step work?
As far as our project. I think 250 ug/ml cyclodextrin will be sufficient based on Ricks previous research into the imune response on zebrafish.
https://www.dropbox.com/s/4c3qzagtlmfahuj/Screen%20Shot%202012-10-12%20at%202.36.55%20PM.png
I want to know if Cyclodextrin stimulates an immune response in the oyster like a pathogen would or if it has a specific gene expression different than that of a general stressor.
As stated in Roberts 2009 the Il17 gene will tell us about wether or not the cyclodextrin has any immune boosting effect.
I also dont think the temperature shock is necessary to give us this information.
Lab Day 2 October 2 2012
RNA Extraction Part 1
RNA ISOLATION PROTOCOL
- 1. Label the snap cap tube containing your tissue sample with your initials and the date using a lab marker. Keep the sample stored on ice until you are ready for homogenization.
- 2. Add 500uL of TriReagent to the 1.5mL snap cap tube containing your tissue. Store on ice.
- 3. Carefully homogenize the tissue using a disposable pestle. If the tissue is difficult to homogenize, carefully close the tube tightly and briefly vortex the sample.
- 4. After the sample is completely homogenized, add an additional 500uL of TriReagent to the tube and close the tube tightly.
- 5. Vortex vigorously for 15s.
- 6. Stop here for Lab 1 and give your labeled homogenized tissue sample to the TA for storage at -80ºC. You will be finishing your RNA extraction in lab next week.
- Used .06 g of tissue sample (Olympia Oyster gill 17g)
DNA Isolation (DNazol)
DNazol Extraction Protocol (Adapted from MRC manual)
- 1. Using a sterile pestle, homogenize your tissue sample in 0.5 mL of DNazol in a 1.5 mL sterile microfuge tube. After the tissue is homogenized, add 0.5 mL more of DNazol and mix well.
- 2. Let your sample incubate for 5 minutes at room temperature.
- 3. Spin your sample at 10,000 x g (room temp) for 10 minutes.
- 4. Transfer your supernatant to a new, labeled tube.
- 5. Add 0.5 mL of 100 % ethanol to your sample.
- 6. Mix your sample by inverting your tube 5-8 times.
- 7. Store your sample at room temperature for 1 minute.
- 8. Your DNA should form a cloudy precipitate. Remove the DNA and put in a new tube using your pipette.
- 9. Let your sample sit at room temp for 1 minute and remove the rest of the lysate (liquid that is not DNA).
- 10. Wash your DNA with 1 mL of 75% ethanol: Pipette the ethanol into your DNA tube, invert 6 times, and let sit for 1 minute. Remove the ethanol from the tube and repeat.
- 11. If there is ethanol left at the bottom of your tube after the second wash, remove with a small pipette.
- 12. Add 300 µL of 0.1% DEPC water to your DNA and pipette up and down multiple times to dissolve.
- 13. Bring your DNA sample up to the Nanodrop to quantify.
- Tissue sample .041 g (Olympia Oyster Gill 17g)
- Centrifuged at 5,000 x g for 5 minutes
- Wash 1 pellet stayed on bottom started to peel off side
- Pellet floating around but stayed solid
- Used p200 to get all liquid out of bottom of tube
- First added .150 ml of DEPC water and pipetted up and down to dissolve. Very cloudy so added another .1 ml of water for a total of .25 ml
DNA Quantification
- 1. Pipette 2µL of 0.1%DEPC-H20 onto the Nanodrop pedestal and lower the arm.
- 2. Select "dsDNA" from the pulldown menu
- 3. Click "Blank", to zero the instrument. NOTE: steps 1 and 2 only need to be done once for the whole class.
- 4. Pipette 2µL of your DNA sample onto the Nanodrop pedestal and lower the arm
- 5. Click "Measure". Record your DNA concentration (ng/µL), A260/280 ratio and A260/230 ratio. NOTE: The Nanodrop uses the Beer-Lambert Law to calculate DNA concentration for you.
- 6. Raise the arm and wipe off you sample with a KimWipe
- 7. Clearly label your stock DNA sample with the word "DNA", source organism/tissue, your initials, today's date and the concentration in ug/uL.
- 8. Store sample at -20ºC.
When the 230 ratio is high this means there is a lot of ethanol, salts and solvents left in sample.
My results were
ABS 9.129
ng/μl 397.1
260/280 = 1.89
230/260 = .87
This means I had a lot of dna in the sample but also a lot of salts or ethanol left. This is probably due to the type of tissue used. I used Gill tissue which would contain a lot more water than say a gonad sample due to the mechanics of the structure.